Re-Envisioning Santa’s Post Office
One of my most beloved annual LEGO themes remains the Winter Village series. As we head into fall every year, we eagerly await the announcement of that year’s release. The new Santa’s Post Office (10339) for 2024 and the accompanying set Santa’s Delivery Truck (40746) are welcome additions to that long tradition since 2009. It brings the theme back to the North Pole, which are my favorite Winter Village sets. And it brings a whimsical approach to an otherwise mundane concept of a post office. The big highlight of the main set is the hot air balloon, as well as being a well designed set with great play functions.

The official Santa’s Post Office Set Main Build I will be re-envisioning in my own style
But who says you have to stick with the set as is? The beauty of LEGO is that you can make anything you want. You can combine multiple of the same set to create a larger version or a more modular one. You can rework a set to tweak something you don’t like (like what we did to winterize the A-frame cabin). Or you can re-envision it from the ground up and create something new.
As a fellow Winter Village enthusiast and an avid MOC builder (BrickBuiltJosh), I took that last route with the new Santa’s Post Office set. I loved the idea of it, and the incorporation of the hot air balloon was really unexpected (in a good way). It even had a roof construction style like my elf workshops (I’d love to think I might have inspired the designers, but probably wishful thinking!).
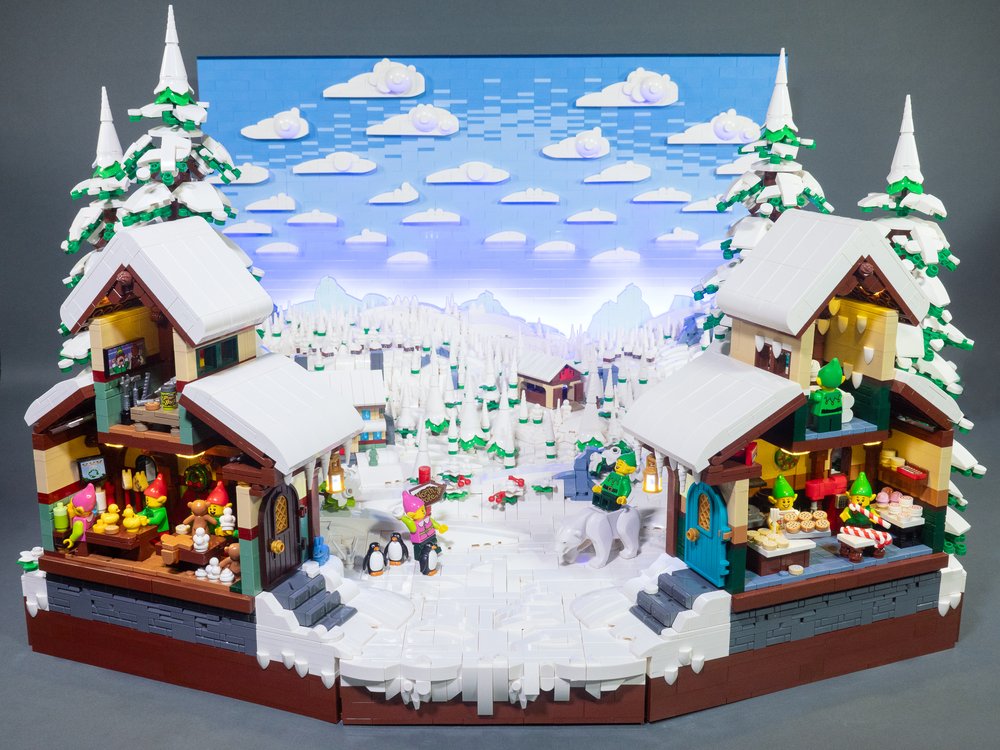
My Previous North Pole MOC (see my previous article exploring the journey from start to finish)
But when I saw the photo reveal, I just wasn’t completely sold on the overall look since I primarily have them for display. Plus, it’s dominated by an excellent play function that I honestly won’t use much (the mail chute and sorting machine). So I thought, why not take a stab at re-envisioning my own version based on the underlying concept?
I didn’t quite realize what I was getting myself into when I took this on. I wasn’t even starting until early December. And to start things off, the actual set came late due to a shipping snafu. A lot goes into these sets. The short time frame only made that more pronounced.
Starting from the Source: 10339 Santa’s Post Office
I wanted to honor the original Santa’s Post Office set first and build it in real life instead of just judging it based on my impressions from the pictures. I have to say, when building it and seeing it coming together in front of me, I enjoyed how it came out more than I expected. The play features are great, the hot air balloon is a wonderful element (that we made fly!), and it is overall a well-built set for what it was meant to be. And the value continues to be excellent.

Back View of the official set
There were lots of great details hidden around, like Santa’s nook for working on his lists and opening letters from the children. There’s a book that appears to be a mail log for Santa. There’s a mail sorting station. And there’s the pole for directions and the post office sign that is a common thread throughout the sets based in the North Pole. The large brick-built recreation of the postal horn symbol looked great and was cleverly built. I was definitely carrying over that detail verbatim!
View fullsize
View fullsize

View fullsize

View fullsize

View fullsize

For me and many adults, the prime reason for Winter Village sets is to display them. So, I’m looking for a visual presence. From that perspective, the sprawling structure came off a bit too disjointed, without a clear visual anchor or a cohesive composition that captures or guides the eye. The design and color scheme did not quite fit with my other North Pole favorites like the Elf Club House or the color scheme of delivery vehicles.
The main play feature, while clever, also caused the usable interior space to be short and cramped. Especially when considering the piece count is also taken up by the hot air balloon, landing pad, and thick snow roofs. The attempt to have a wider building with more rooms also stretched the budget thin, contributing to the problem.
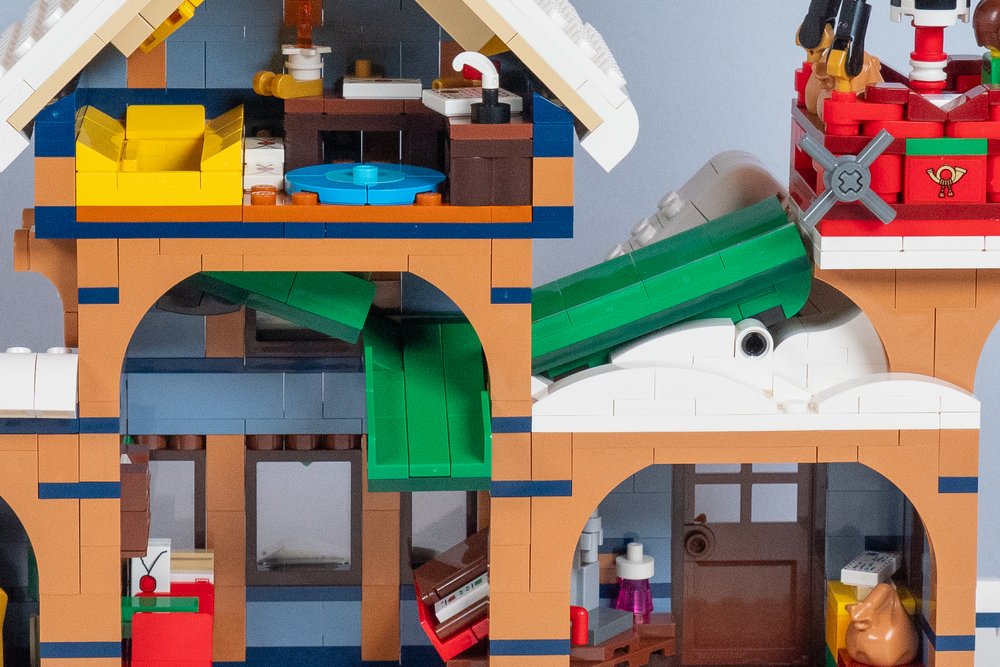
The Mail chutes from the attic room and from the hot air balloon dumping action
Ultimately, building the set according to the instructions got me a better understanding of exactly what I liked and didn’t like about the design. Including what was causing the visual dissonance for me (particularly the windows that I hadn’t realized were windows). I had a better feel for the set and a better appreciation for the build. I also knew what I wanted to carry over. Now it was time to get creative and re-envision it for my own creation!
Setting the Stage: A Builder’s Process
Typically, I start with developing concepts, both in my head and often on “paper” (which could be on my tablet). I start with figuring out key things I want to incorporate or achieve, kind of like an informal design brief. In this case, I wanted to:
Include a spot for Santa’s Delivery Truck to go, probably under the hot air balloon landing pad as a useful spot for it.
Make sure it fits with the style of some of my favorite Winter Village builds, like the Elf Clubhouse (set 10275) and Gingerbread House (set 10267).
Carry over the sand blue, but adjust the color scheme and maybe go with dark green instead of dark blue. This would also align more with the color scheme of the postal truck and postal balloon for a more cohesive postal brand.
Definitely re-use the brilliant brick-built postal horn on the front.
Carry over some of the ideas like Santa’s reading nook, the book, letter sorting, etc., and have thick snow on the roofs.
I also wanted to add more of a traditional post office feel that serves mail within the North Pole, not just the incoming mail from kids. Having a space for the delivery truck would help with that. I’d use the first floor as a place for the North Pole residents to send and receive mail, as well. After all, the Gingerbread House had a mailbox, so they must operate postal routes within the North Pole!
To get started, I generally let it stew a bit, letting it sink in, exploring in my mind the references (the original set, the Elf Clubhouse, the delivery truck), musing on build details and techniques or parts I could use that would be interesting. It seeps into my consciousness and shifts and forms until something rises up that feels like a more cohesive vision rather than a jumble of ideas.

When it’s clear enough, I may start drawing it out. I keep it loose and will sometimes note particular parts or features I’m thinking of or to explain something that may be confusing later. I don’t usually bother noting everything since I’ll likely remember by looking at the drawing and knowing I have a short timeframe. Each project is different—sometimes, I do more sketching and notes or adding color, and sometimes, I go more by what’s in my mind.
Setting the Scale
Making the drawing a reality involves playing with colors, seeing how the parts actually come together, and prototyping, playing, and experimenting as I go. I typically tackle a key component first, either something harder to build or that will affect the scale of everything else. In this case, that was the post and beam structure of the drive-through delivery truck area. It had to fit the truck and have the landing pad on top, so it was a rigid scale that everything had to work around.

It ended up being bigger than I thought. The delivery truck in particular demanded more room inside the structure than I realized. I knew it would impact the proportions of my drawing, and I’d need to account for it in how I built the main building.
To keep it as compact as possible, I had to keep the beams simple and straight. But, I wanted to incorporate some flourish. So, I started experimenting with different elements to add some curves to the sides between the beams. Some brown dinosaur tails and sausages stuck into SNOT bricks added some elegant curving elements to the open space, along with some curvy fencing. And I included some places to add festive decor that wouldn’t get in the way of the delivery truck.
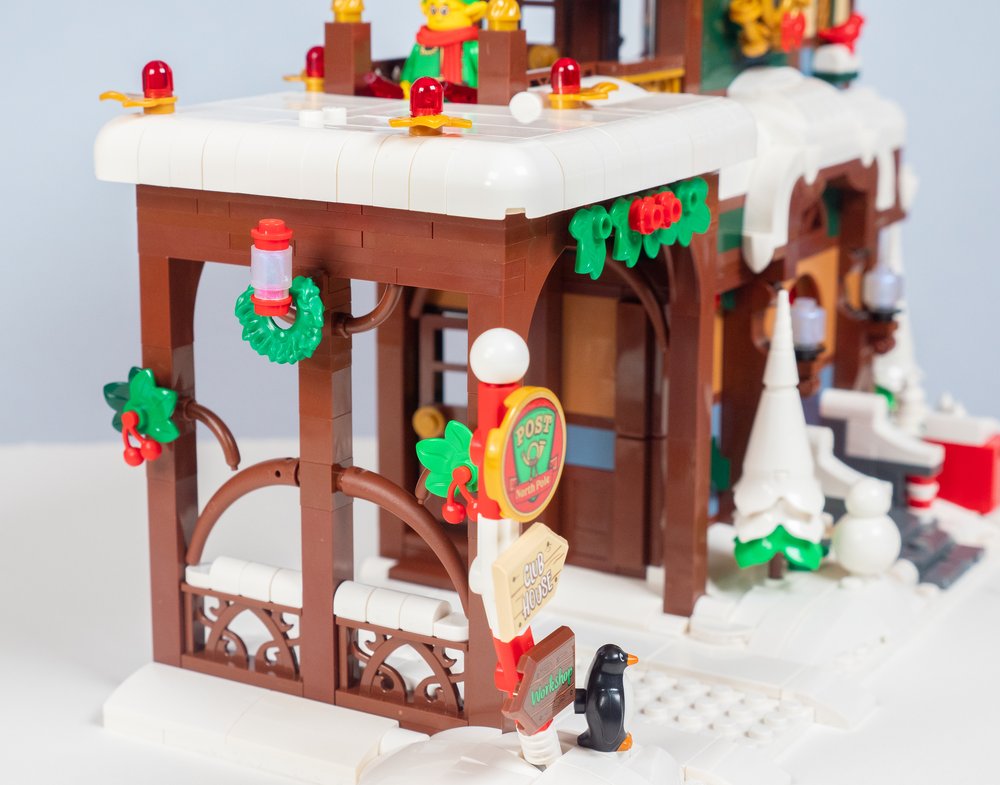
Starting on The First Floor
With that situated, I moved on to figuring out the foundation and front facade of the building. The front facade would largely determine the exact dimensions of the foundation. So, I kept the width of the foundation open-ended and started prototyping the front facade. I ended up reworking it a few times—readjusting proportions, making it more compact, and coming up with design aspects that changed the layout.
At first, the front was flat aside from the vertical beams. It felt too dimensionless, so I bumped out the doorway a bit for some depth. Then I felt it needed a little bit of an overhang as well, again to add more character, more dimensionality, and some more curves. That actually worked out well because I needed more height for the building so the second floor would get close enough to the surface of the landing pad for this all to work.

The covered area for the delivery truck (and hot air balloon) and the front facade design combined to finalize the footprint for the set. Now it was time to finish the first floor walls, and then build up.
The overhang/landing pad was already taller than I envisioned, so I knew I’d have to adjust somehow to make the vision work. I also ended up raising the building foundation with the intention of adding more snow and a front stairway, all adding additional height as well.
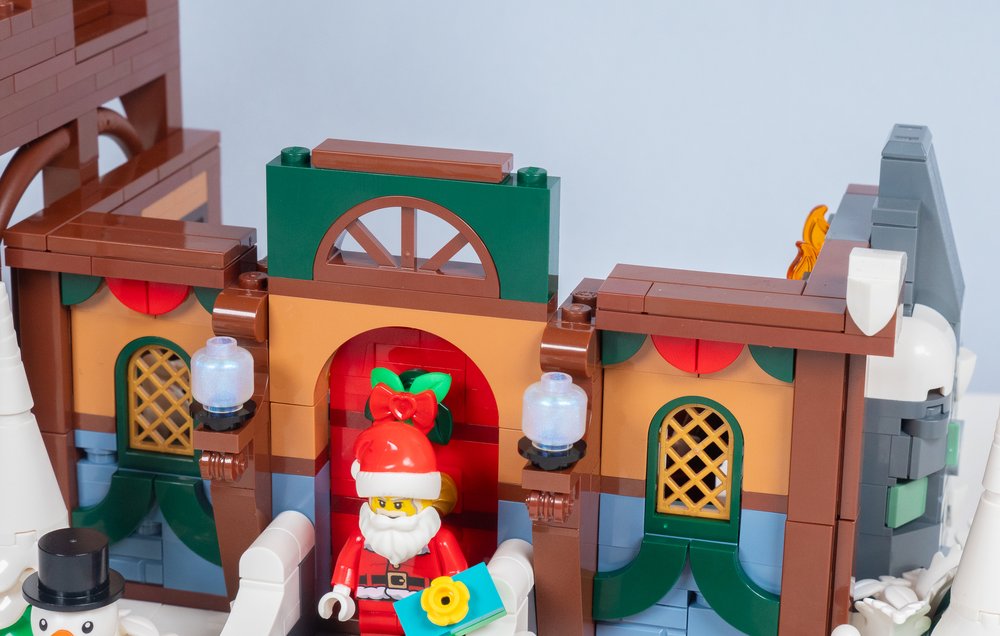
When I started thinking about the next floor, I decided I wanted to have the upper floor lift off. So I started building out how I was going to interface the upper floor onto the lower floor with minimal studs. I experimented and ended up using a couple of beams and then layering up a pretty thick floor with an extra area of dark green dividing the floors visually from the outside. This allowed me to get more height to better align the second floor with the landing pad. I also added more snow to break up the floors as I added height and more depth and dimension.

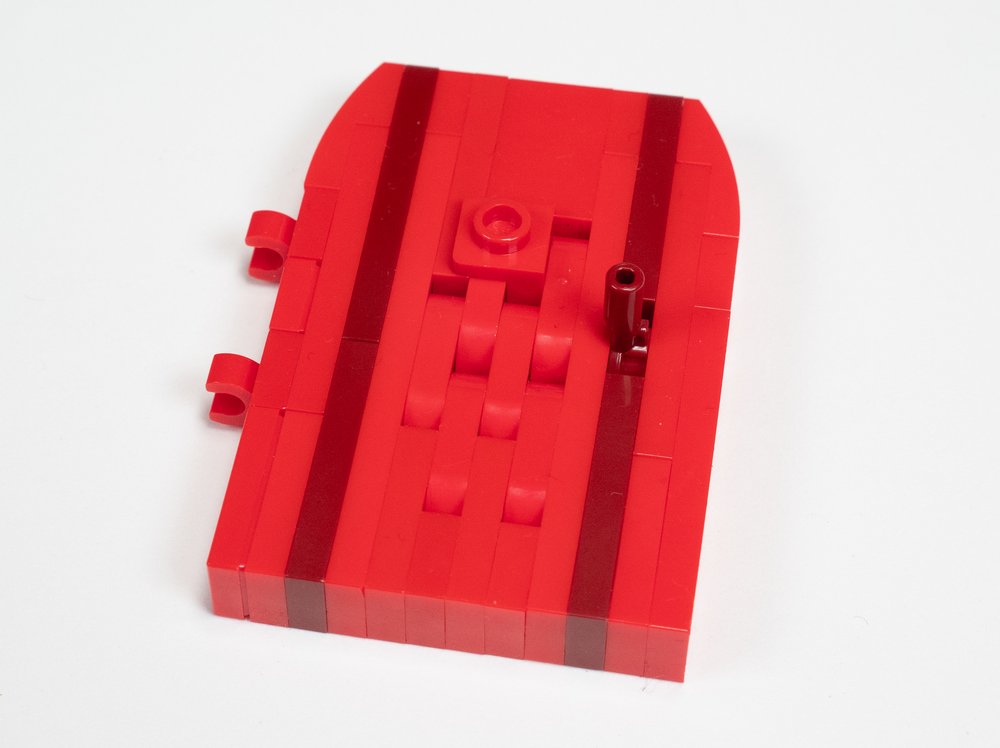
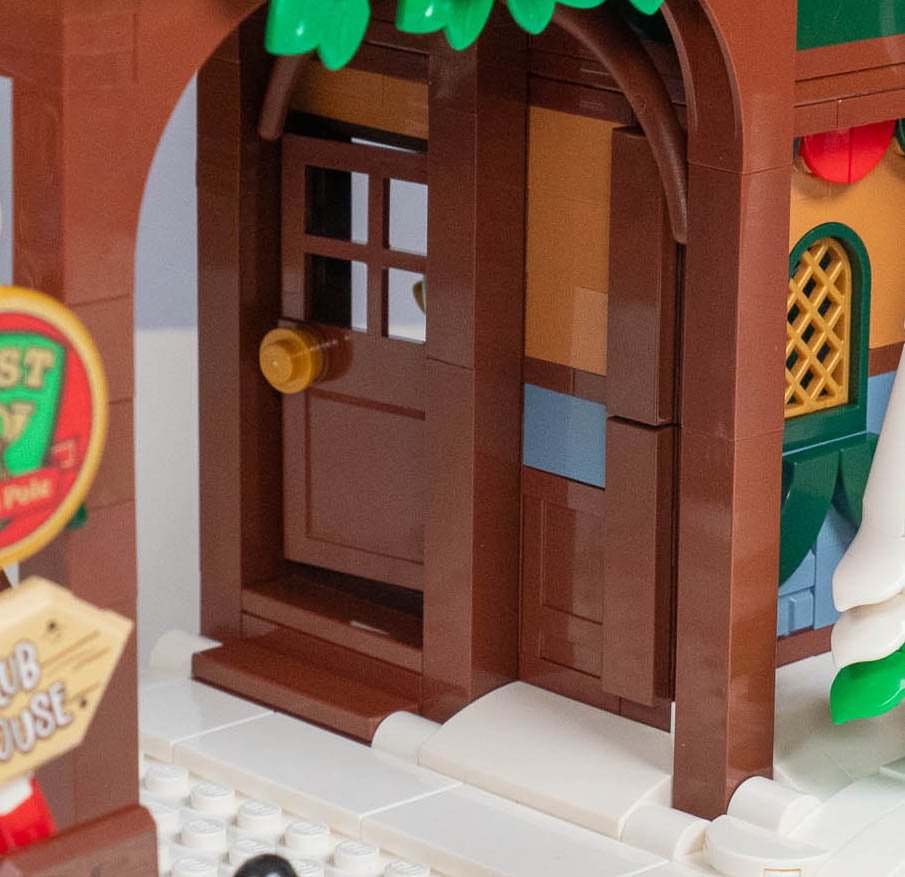
The door was a detail I went around and around on… whether to use a door element or build a door. Whether to use outward-facing plates like the rounded door on the Elf Clubhouse or stack plates vertically or horizontally to get a detailed design.
I went with stacking plates and started with this door that had the plates sideways. I thought the clips had the door in the right placement with an initial test, but then I put the completed door in, and it was too off-center, especially with the details added to the door. So, I redid it with vertically stacked plates for the final version. Figuring out the door took up a surprising amount of time, but I was happy with the final look.
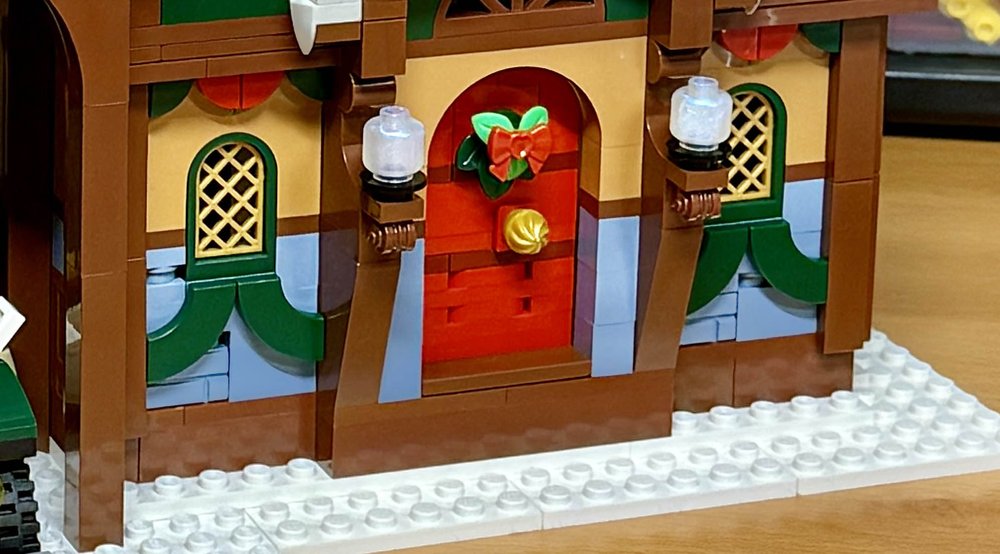
On To the Second Floor
With the first floor figured out, it was on to the second floor. The walls went a lot faster as I continued the design style already established, but I lightened the second story to tan to add some depth and subtle variance going up. I found I needed the dark green to bring out the gold of the postal horn. I did some configuring and reconfiguring to get the placement of the horn and framing of the dark green just right without becoming overbearing in the overall design.
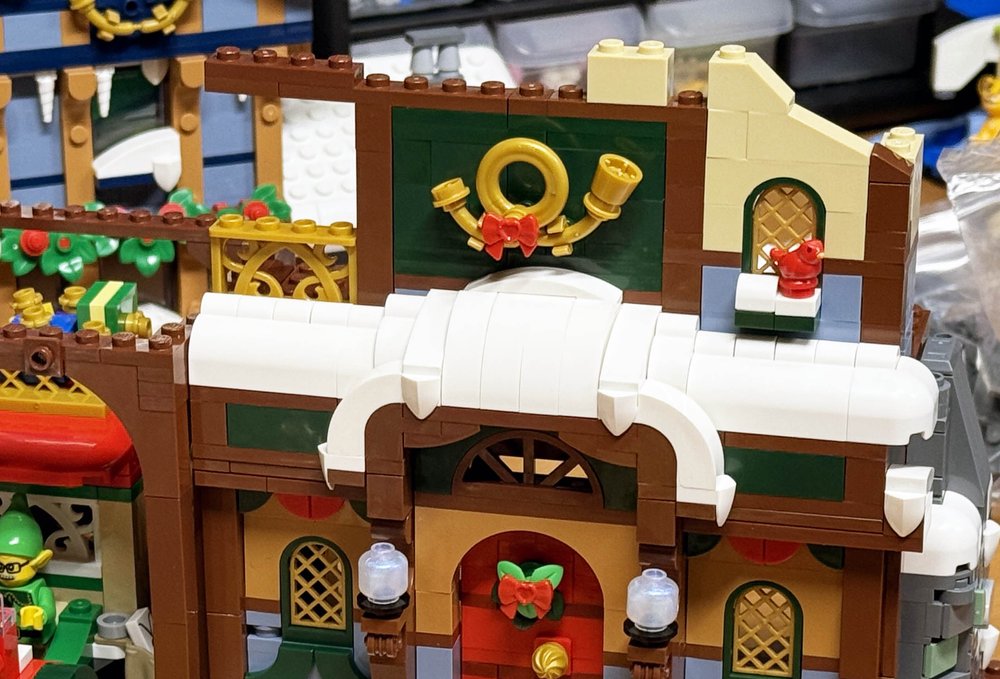
Lastly, I added the deck that would lead to the landing pad stairs. That left me with the bane of every building creation—the roof. It always takes the most time to figure out a roof structure that works. It needs to not have too many, if any, visible gaps. It sometimes needs to work with weird angles. It needs to work around the chimney. And it needs to allow stairs to access the landing pad for the elves to get up to the hot air balloon, so the roof had to have enough clearance on that end.
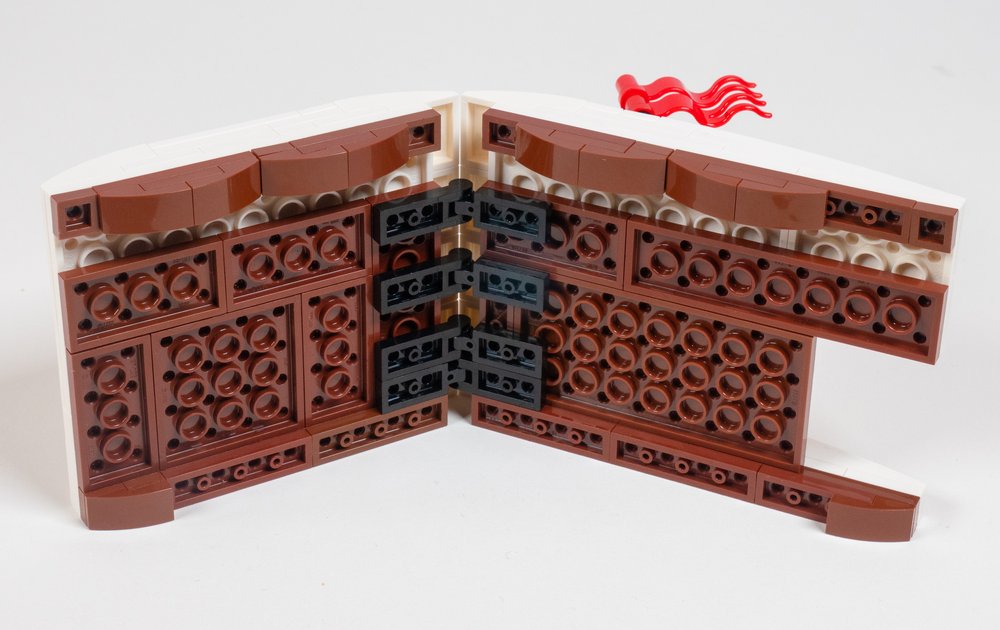
Thankfully, using bars and clips, I was able to create a custom angle that worked well and had the edges of the curved slopes at the roofline just touching. I used long curving slopes because I wanted to give the snow on the roof a very gentle curve instead of going flat on top. I also used curves at the roofline to give it a more rounded shape at the apex. The roof slots right into place securely without a stud connection.
There was, however, a gap to hide in the front. I thought I had a plain brown shield that had a bar sticking out to push into a SNOT brick. But I couldn’t find any like that. But then I realized I had those Forestmen shields, which have a reindeer look and matching colors. How perfect! It fits the theme, hides the gap, and sneaks in an easter egg.

The removable second floor, and the roof with the Forestmen shield hiding the gaps.
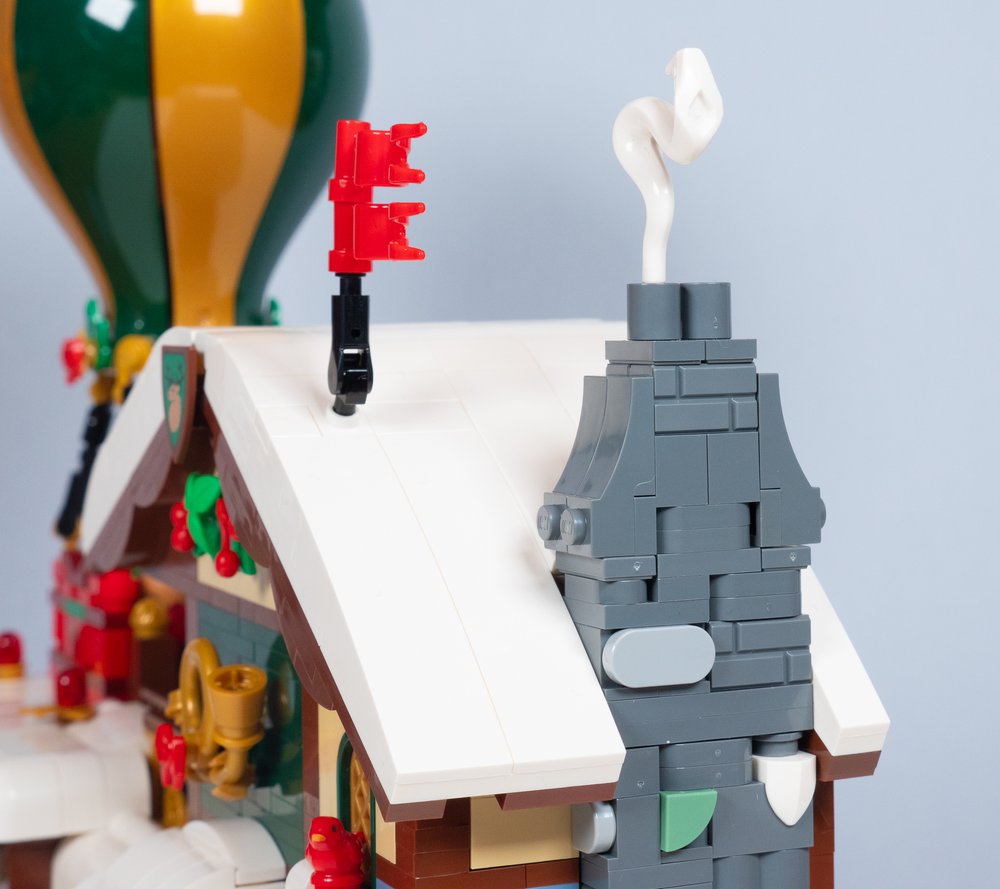
One thing I liked from the official set was the flags at the top. Somehow it felt more like an official building elves needed to spot in the village. So, I incorporated that into the roof. And lastly, I finished off the chimney with a little flourish, and adjusted the roof “snow” to hide the gap. The chimney top uses jumpers and 1x1 technic beams (part 18654), with a white snake (98136) you might have seen being used as smoke, which fits perfectly into the hole of the jumper plate through the technic beam. The sides of the top use some inverted curves and SNOT to add some flourish and narrow it down to 2x2 at the top.
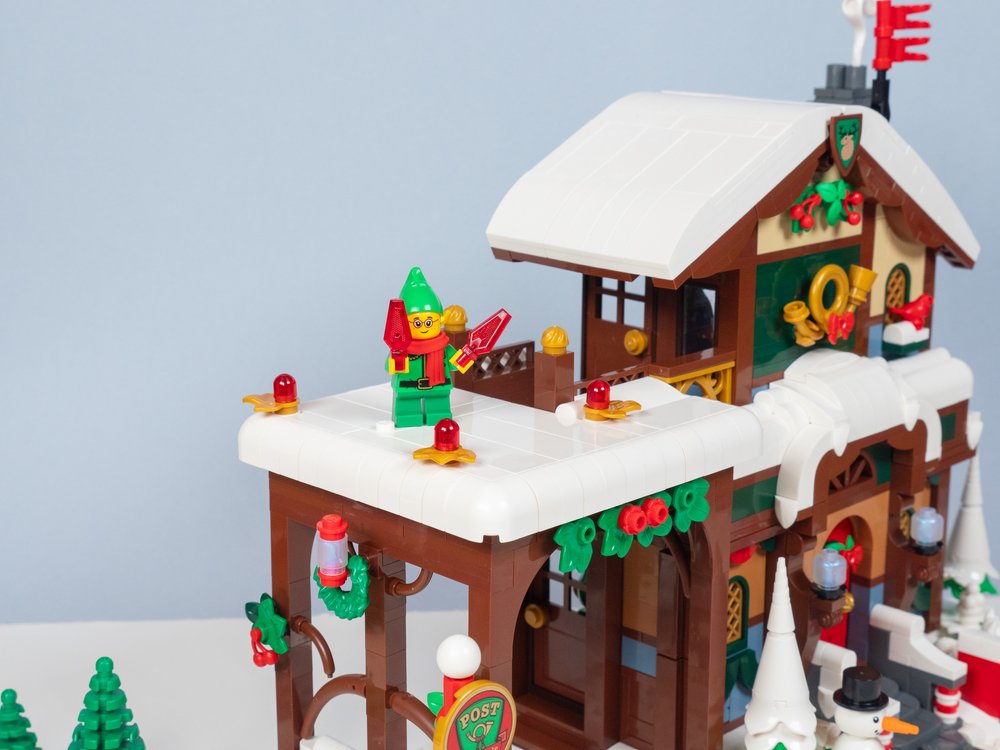
The last structural thing I completed was the hot air balloon landing pad. I built a stairway into the snow for the elves to get up to the surface of the landing pad and snow and incorporated landing lights with a little holiday flourish with the gold leaves. I was running out of time quickly, but I had the bulk of it complete! Now, it was time for details.
Completing the Scene
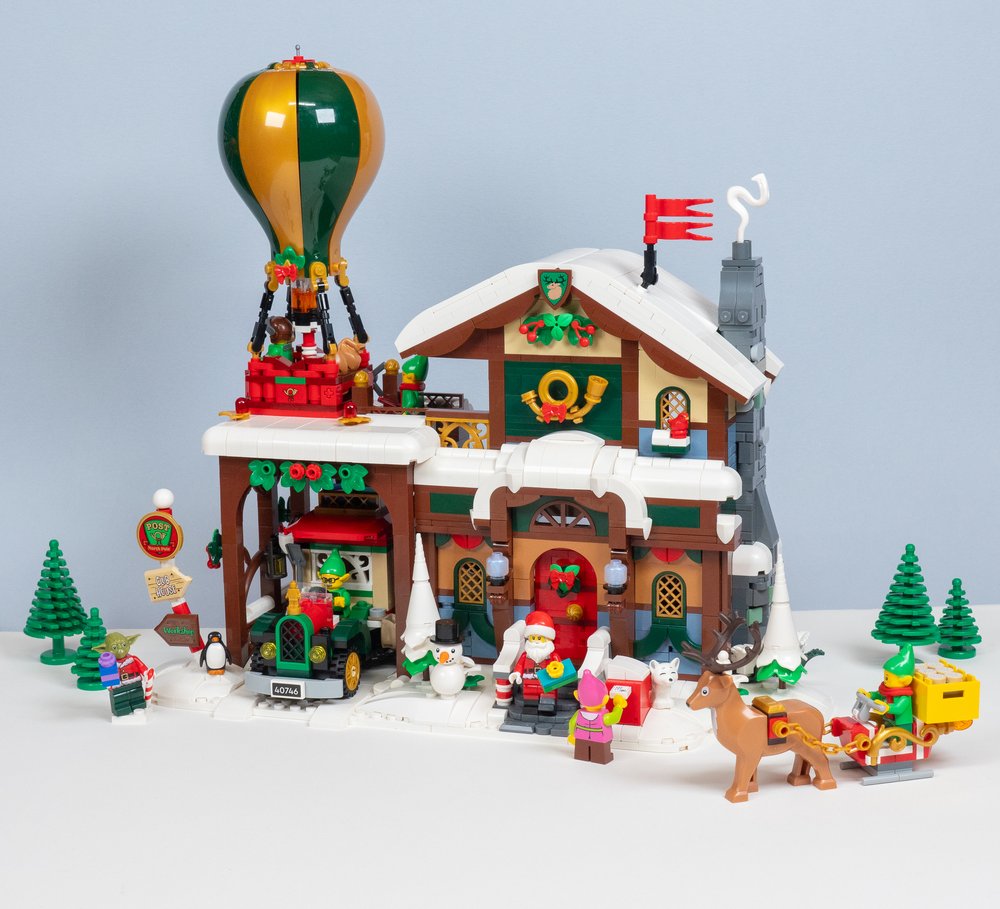
With the structure figured out, I was free to finish the landscaping, interiors, and other details. I incorporated the pole with directions/signs from the original set right into the landscape, off to the left like in the other Winter Village North Pole sets. Then I started playing with curved slopes to fill in the snow throughout the base, expanding the base here and there, adding curves and places for foliage and animals.
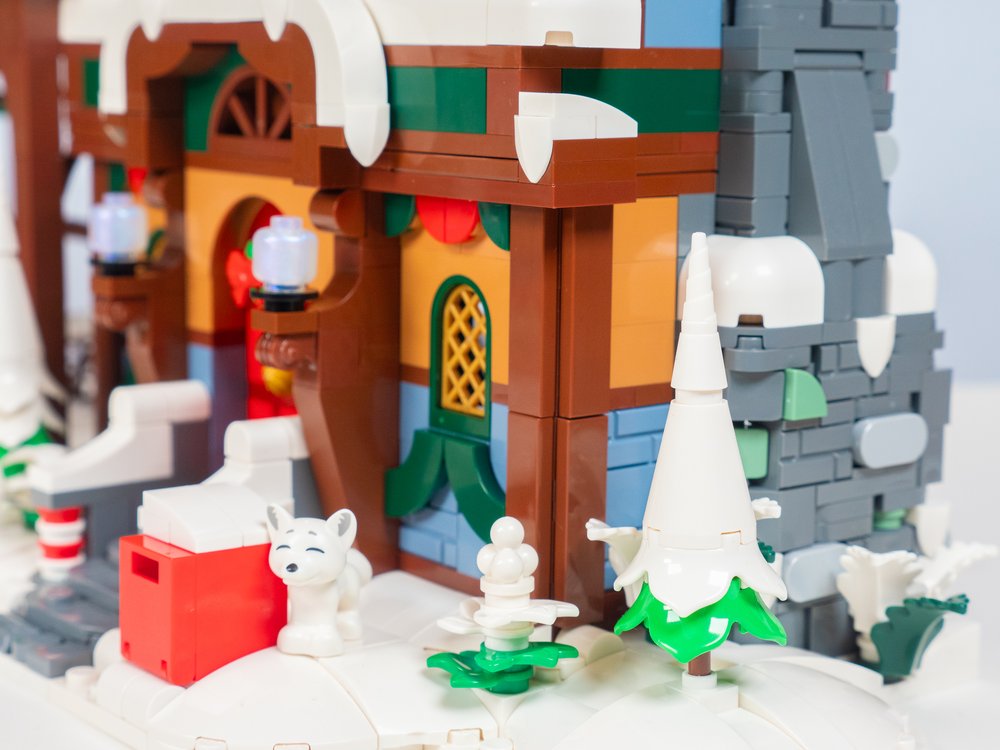
I love foxes and had to use this snowy fox somewhere. As well as the penguin and small pine trees that carry over from my North Pole and elf workshops previously featured here.
I utilized some of the amazing new parts and recolored elements that have been coming out that are great for foliage—including the fern leaf pieces. I really feel like we’re in a parts renaissance, especially for botanical elements and re-colors and other detailing. The botanical line and the speed champions line have been particularly helpful in that regard! Including the greater range of slopes I used in the snow.
On the side of the overhang, I loved how the wreath came out using the fur collar piece, now in green, and simply having an espresso piece stuck into a bracket hole to hang it there. The gap in the collar is just right to keep it from slipping off. It works amazingly well.
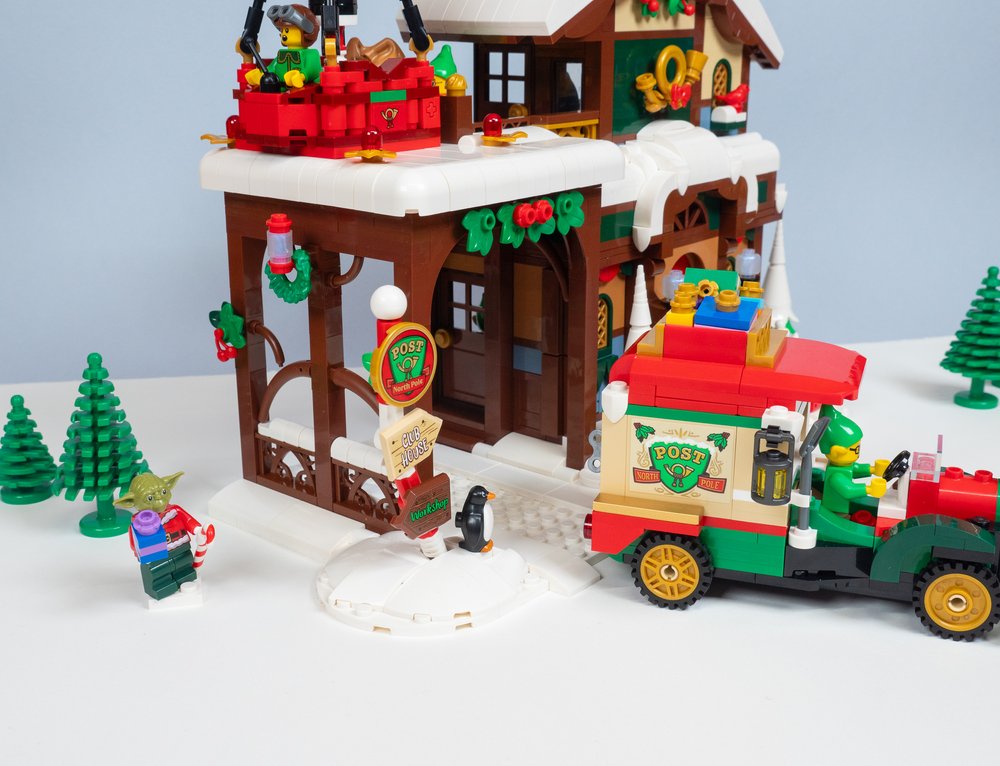
Green fur collar wreath on the side of the delivery truck drive through overhang and landing pad supports
Then it was on to the last part—the interiors. I’m not sure why I put it off until last, but I had at least a rough idea of what was going on there. I think it was to avoid stopping my momentum, as the interiors get very nitty-gritty with building, placing all the small bits and flooring and places to pose the minifigures/animals.
Since I’m not constrained by budget and project requirements for a set, I was able to finish everything off in detail, including the smooth, snowy landscaping and the fully tiled floors. I went with a slightly rustic wood floor cabin-y look.
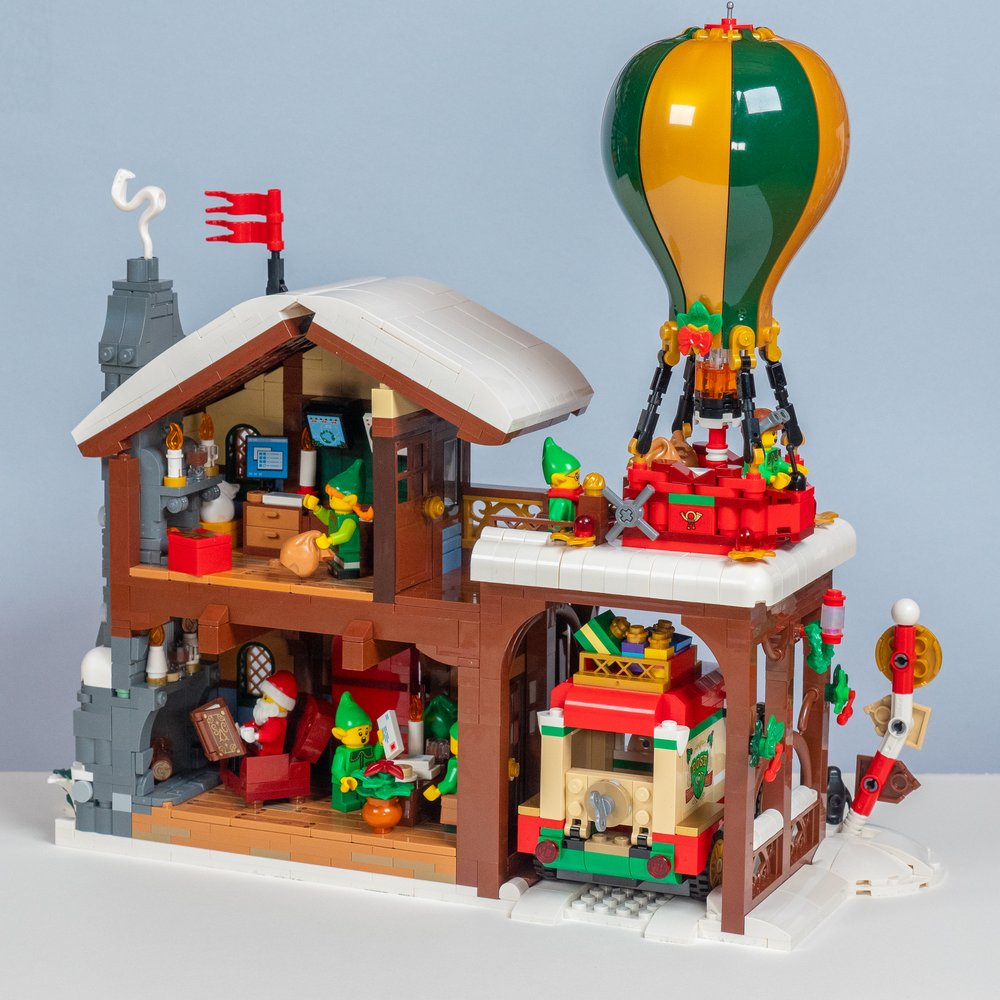
The first floor had two key areas—the reading nook with cozy fireplace and armchair, and the post office counter and staging area for the delivery truck pickups. I borrowed the wonderful (albeit stickered) book from the official set for Santa to review as he sat by the fire. I was going to add the stack of letters to his chair like in the official set, but it felt too busy.
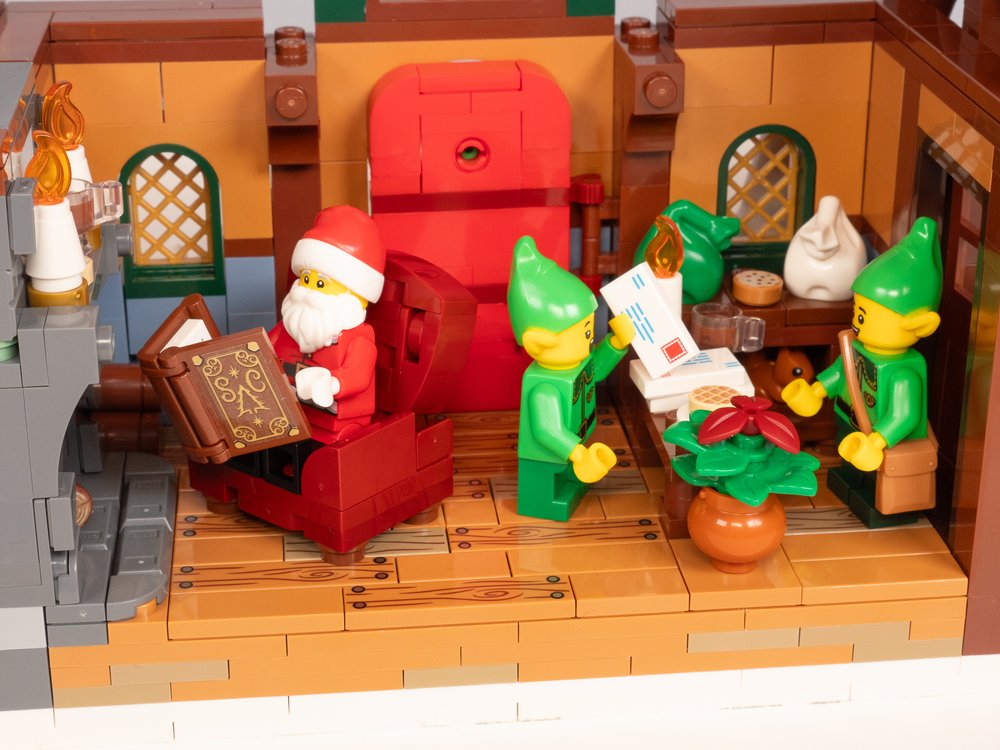
The fireplace itself had some details like the hot cocoa, candles, and a cookie on the mantle, detailing along its face, and wood logs in and by the fireplace. The fire itself uses multiple different flame elements, black round 1x1 plates for coals, and a log held at an angle above the coals.


I used an espresso handle piece to position the log at an angle and mounted it on a jumper so it was in just the right spot against the flames. A stack of similar logs are beside the fireplace.
The armchair itself is a detailed little build that was almost too big, but it worked. I actually borrowed it from my Bruno habitat build from this article, where you can see a lot more about how that was built.
Then, there is the postal counter area. The taller bench along the back was actually started early. It was built into the wall at the delivery truck drive-through area to add extra detail. I used those brown boxes with the extra profile detail.
I originally planned to have letter sorting and maybe even pneumatic tubes to evoke the mailroom scene in Elf. However, the pneumatic tubes didn't make sense in this build,, so I opted for a storage area for mail to hand off to the delivery truck as it comes by.
One fun detail is I purposely left an open area underneath where a pet squirrel is hiding out. And in front is a small footstool since the elves are a bit short for that shelf!
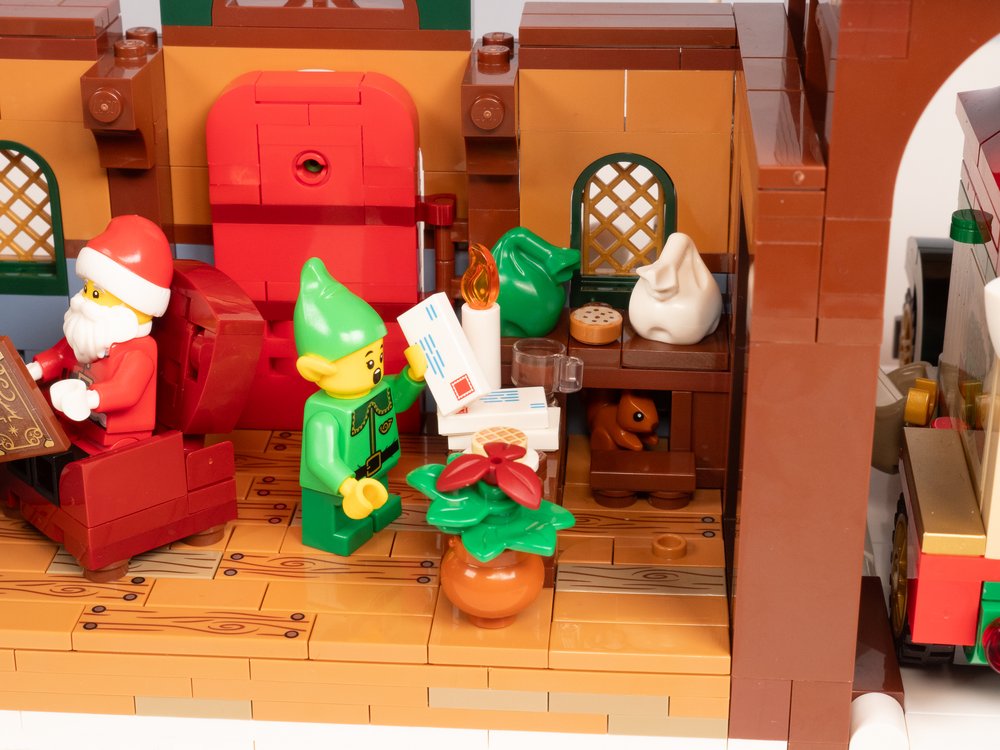

One of my favorite mini-builds is the poinsettia at the end of the mail counter. I’m not sure how that hasn’t been used in a Winter Village yet! What’s more iconically holidays as a house plant? It came together accidentally when I did some of the garlands outside the building and tried using the dark red three-leaf piece for added color. It didn’t work where I planned it, but it dawned on me that this is perfect for a minifig scale poinsettia! It came together easily, and the trickiest part was figuring out what to use as a pot. I ended up using Winnie the Pooh’s honey pot! I just turned it around, so you don’t see the printing.

Finishing off the story, there is the postal elf with his satchel and an elf customer with a letter to send, hoping to get it before the delivery truck leaves! On the counter, I was going to add a little cash register with an old-style gold handle to ring it up, but it didn’t work out as I’d hoped, mostly because I didn’t have space for it. But I included a candle, letters, snacks and hot chocolate of course.
There’s the cookie again, which refers back to my elf workshops with the bakery churning out cookies to keep all the elves fueled up, considering the amount of energy they expend! And on a plate (a teacup saucer actually, perfect size!), there’s a waffle, a callback to the Elf Clubhouse. There’s also plenty of subtle detailing with the build of the counter/benches themselves. It is simple but effective to add a touch of nuance.
With the first floor complete, it’s time to head to the second floor. The second floor is much more about sorting, operations, and air traffic control. You’ll see bins for sorting mail with letters in them. Above are screens that show a radar screen for air traffic control (fun classic space easter egg) and delivery routing (taken from a previous year’s workshop GWP). There are drawers for supplies, a computer for operations, gift boxes and mail bags, and, of course, the fireplace.

The fireplace is simpler and smaller as the chimney narrows as it goes to the second floor. But it still has plenty of details, and a mantle with a different style of candles that use a white technic pin (6388018) as the candle itself, placed on a Round 1 x 1 with Bar and Pin Holder (part 31561). And of course, there is hot chocolate there, too. It’s how the elves stay warm, after all!

Finishing Touches
And finally, there are the last little bits outside. I love LEGO animals and always look for ways to add them in. I’ve mentioned three so far, and there’s one more, a cardinal up on the windowsill, which reminds me of back home in the Midwest, particularly in the winter. You’ll also see that I carried over the snowman from the official set but swapped out the head and incorporated the postal box next to the entryway.

The front stairway itself was one of the last things I added. I incorporated the snow on the railing while adding some flourishes there. The candy-cane striped fronts were an unexpected addition that came up randomly as I saw an empty gap in front as I was playing with configurations of parts for the upper railing. It started with using gray round bricks in the gap, but then I thought, why not candy stripe it?
For these shots, I also modified the reindeer sleigh from the Elf Clubhouse to be a delivery method for distributing the cookies and goodies. Another reference back to the bakery and candy shop from my North Pole elf workshops.

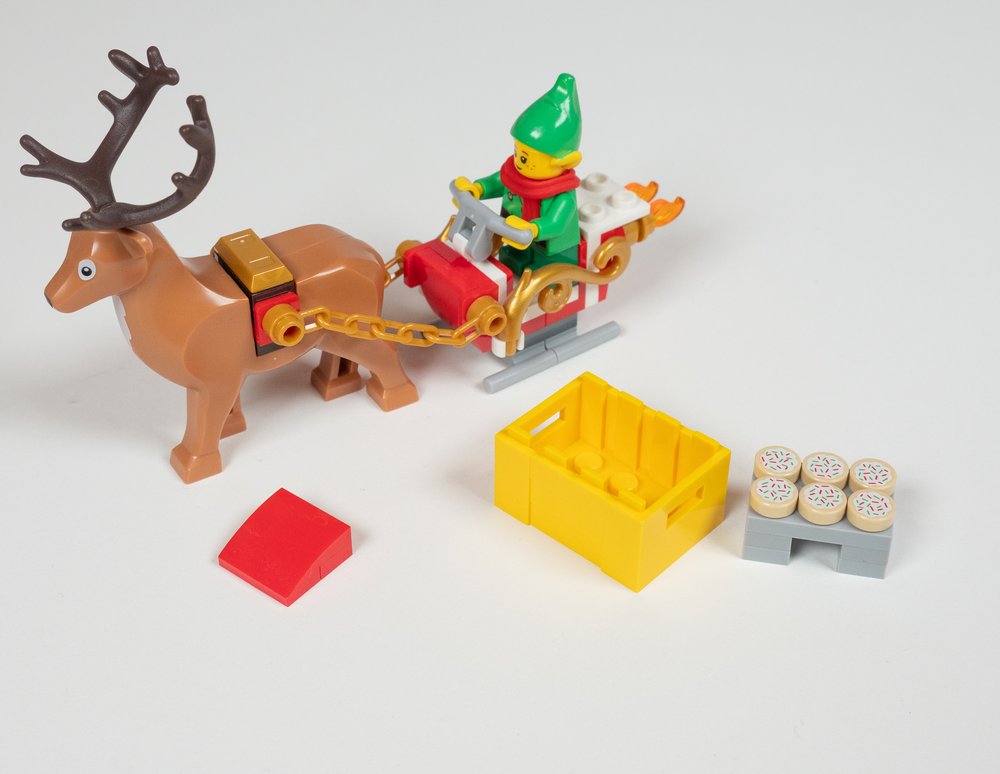
The red part is what was removed. Then the others were added.
I’m very happy with how it all turned out. It stayed true to the spirit of the original sketch and vision, even if the details evolved a lot. With more time, it might have evolved even further. But then again, a deadline always helps move things along!
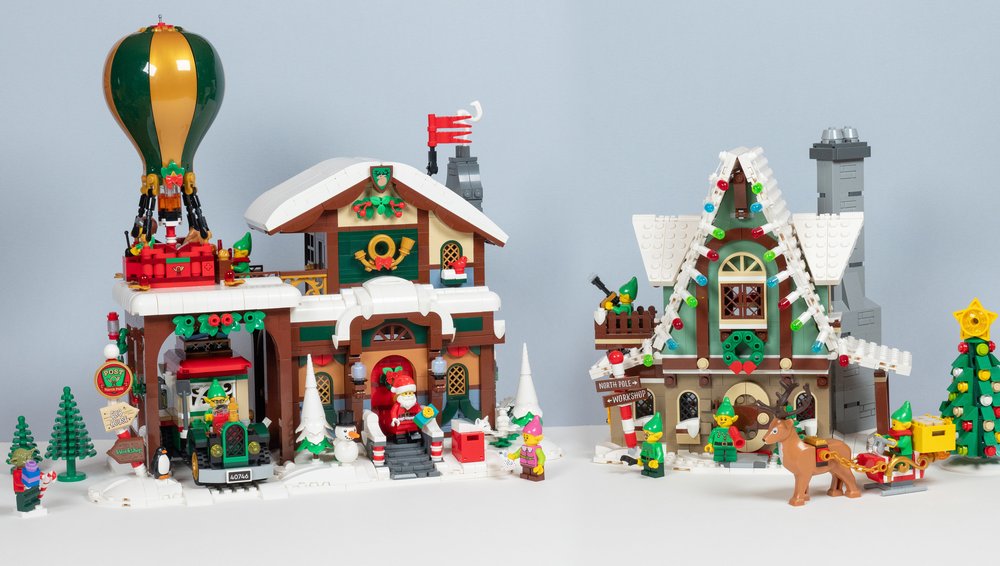
The Elf Clubhouse next to it works well, aside from the simpler style of the official sets with the roofs and ground. It also works with the Gingerbread House. I’ll leave you with a gallery of some additional details if you’re interested in seeing a little more.

The core build without all the extra elements around it
Ultimately, it comes down to what you’d like to see, more than what’s official or what’s “right” or “wrong.” LEGO is what you make it. You don’t have to stick with the set that comes out. What Winter Village set would you like to see re-envisioned?


What Winter Village set should we reinvent next? Let us know in the comments below.
Do you want to help BrickNerd continue publishing articles like this one? Become a top patron like Marc & Liz Puleo, Paige Mueller, Rob Klingberg from Brickstuff, John & Joshua Hanlon from Beyond the Brick, Megan Lum, Andy Price, Lukas Kurth from StoneWars, Wayne Tyler, LeAnna Taylor, Monica Innis, Dan Church, Roxanne Baxter, and Steven Laughlin to show your support, get early access, exclusive swag and more.

