LEGO Ideas 21356 River Steamboat – A brick-built voyage [Review]

The LEGO Ideas line has been churning out sets at a record pace! There are lots of fun models coming down the pipeline. However, speed is not the focus of the latest edition to the collection. Quite the contrary, we’re headed for a relaxing, serene paddle downstream. The LEGO Ideas 21356 River Steamboat arrives on the scene as the largest Ideas set ever produced, coming in at 4090 parts. Based on the winning submission by fan designer Aaron Hall, and made a reality by LEGO designer Marina Stampoli, this model is quite the sight to behold. But does it sink or float (metaphorically – it’s definitely too heavy to actually float)? Join us on a voyage of discovery as we take a closer look! It will be available to LEGO Insiders April 7th and everyone else April 10th, retailing for US $329.99 | CAN $429.99 | UK £289.99.

The LEGO Group provided The Brothers Brick with an early copy of this set for review. Providing TBB with products for review guarantees neither coverage nor positive reviews.
Unboxing the parts, instructions, and sticker sheet
Right off the bat, you can tell this is going to be a substantial model, because even though the box is large, the picture of the model almost doesn’t fit! Roughly square, nearly twice as deep as many other large set boxes, and fairly heavy, it gives off a certain grand presence. A custom River Steamboat logo with the LEGO Ideas #064 completes the look.

The back of the box shows the boat from the opposite angle. Inset images give you an idea of the size/scale, play features, and inner details.

Inside we find roughly the second half of the bags (13-32) and a shoebox-sized carton containing roughly the first half of the bags, loose parts, and instructions.


In my opinion, the intro of the instructions (which, if you’re new to 18+ sets, contain special details about the model) might be the most beautiful I’ve experienced. There are some lovely pictures, a lot of great text, and an inviting ambiance. It just makes this feel like a full experience, even more so than usual.


The set comes with a small sticker sheet. Sometimes I defend stickers, but I’m a little frustrated with a couple of these. I know that printed pieces create logistical issues for LEGO because they have to be warehoused as separate lots. However, at least a couple of these are images that could be used in a multitude of other sets, giving more justification to printing them.

The build
Jumping into the model, we start with the stern (back end). There are a surprising number of gears in the boat and we add four right of the bat. We also have some new recolors here. Surprisingly, the inverted wedges haven’t appeared in reddish brown before.


Next, our build quadruples in size in a matter of moments. Boat hull section not seen since 2020 with LEGO Ideas 21322 Pirates of Barracuda Bay give us our base. The model that was based on, LEGO Pirates 6285 Black Seas Barracuda happens to be Aaron’s inspiration for this model. At this point we also add the boiler.


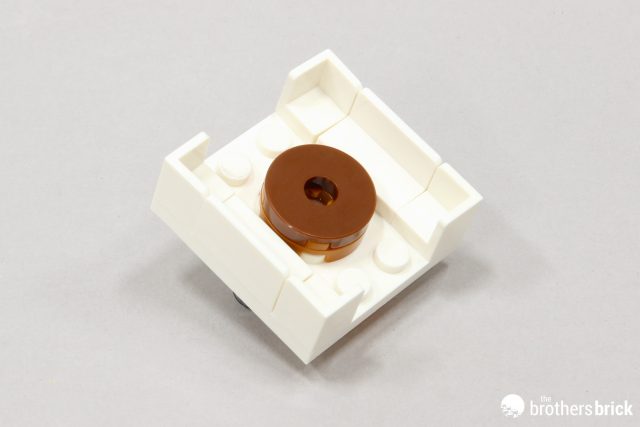
Right as I started to build the mechanism that travels the from the rudder to the top of the boat, I came across the biggest frustration of the whole process. The included gearbox, an essential element, was extremely warped. Pictures don’t quite do it justice, but you can see it pictured below next to the replacement from my collection.
This is a massive problem. As a Technic nerd, I have many of these on hand, but I’ll venture to guess that most people do not have this unique part handy, bringing the voyage to a halt before it even begins. The recent uptick in quality control issues with LEGO sets is really disheartening. I used to sing the QC department huge praises. Out of hundreds of sets in my lifetime, until recently I only had a couple with issues, and replacement parts came within a few days. Now, I frequently hear complaints of parts that are damaged, missing, or swapped for another random part, and getting a replacement is reportedly a major hassle. What happened? Of course, answers are not readily available.


Okay, now that we have that unfortune business out of the way, let’s proceed! This gearbox is unique because it allows you to transfer motion on a perpendicular axis with a couple of baby bevel gears and a 2×4 plate with holes. In this case, it’s a critical connection between the rudder and steering above.

Lots of supporting structure is added next, along with the driveshaft and a few more gears.
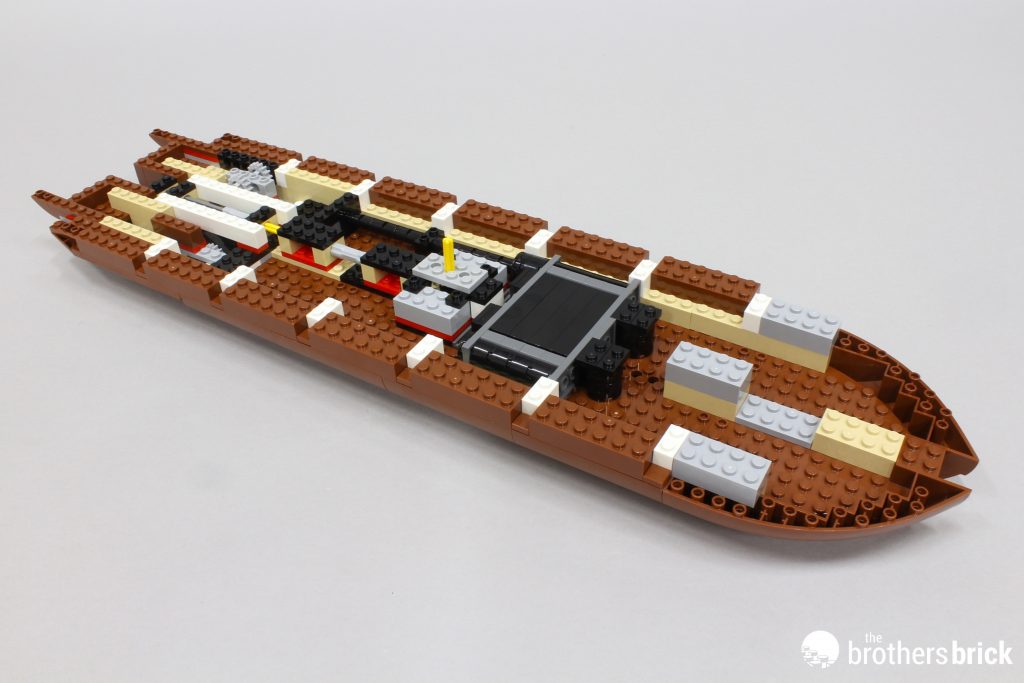
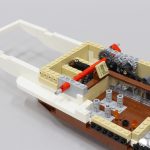
Now that we have the belly of the boat complete, it’s time to cover it all up with plates for the boiler deck. This structure is super solid! (Which is important for the amount of stuff we’re about to put on top of it.

The rudder itself comes next, and uses another means of transferring the axis of movement. I’m a fan of the compact design.


With the next bag, we add the floor footprint for the museum as well as the steam engine piston.

The piston is linked to a series of gears, which in turn is linked to the driveshaft for the paddle. I never would’ve guessed this set would be loaded with gears, but I’m loving the vibe!

Our first sticker shows up as a placard diagram of a steam engine and sits atop a “glass” railing. At the back, we add the support structure for the paddle wheel.

Fleshing out the museum, we drop in a few sub-builds representing steam-powered artifacts. The designers give a little nod to LEGO itself, with a replica of the LEGO engine piston, which has been around for ages. A bonus is that it actually moves with the turn of a gear knob.

Some LEGO instructions contain little snippets of text explaining what certain things are, and I really wish they had done so here. I’m not a steam engine aficionado, as I’m sure most people aren’t, but I was able to find out that the intriguing artifact next to the LEGO piston is a aeolipile steam turbine, otherwise known as “Hero’s engine,” invented by Hero of Alexandria in the 1st century AD. While interesting, and demonstrating the mechanics of steam propulsion, it was more of a toy than something used in practical applications.


Diverting our attention temporarily away from the museum, next we cover the deck with a plethora of tiles.

Then we load up the galley with appliances and fixtures. The instructions mention, “write your own mystery novel from another era in the boat’s kitchen…” but for the life of me I can’t figure out what kind of mystery might be going on here. And it actually looks pretty modern to boot!

Shifting focus back to the museum (while adding walls along the way), we build our final artifact: a Watt steam engine. It’s a little funny-looking with a hotdog bun for part of the piston. It’s also very tempting to make it move but it’s a little too fragile to do so. I think I would have preferred black or gold for the wheel, but now I’m just being nitpicky.

With the museum and galley complete, we wrap up the walls and add lots of windows and a couple doors.

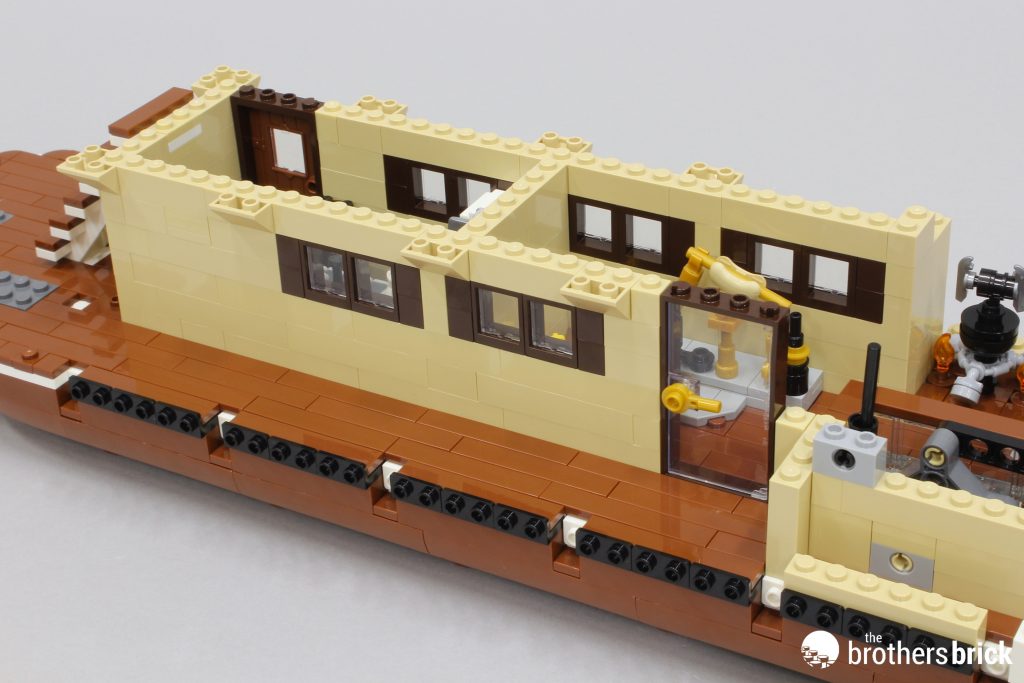
Loads of SNOT (Studs Not On Top) bricks come next. These will receive the a bunch of tiles to give this exterior section of the boat its unique look. Meanwhile, a couple of those stickers pop onto some tiles to adorn the walls, including a blueprint of the model. Once again, at very least the generic caution sign should’ve been printed.

I love that this section looks weathered yet very clean.

Moving right along, the outer ring of the main deck is installed, provided a nice cover for the boiler deck below. There’s also a column-flanked staircase with a couple barrels tucked behind it. A ton of dark blue brackets are used here, making for a nice color scheme. Although their faces get covered, the thin lip is visible from above, forming a tiny accent line – a detail that I love!

Another detail I love: the columns! Long sloped assemblies tuck inset into the hull, and the result (especially adorned with railings and buoys) is fantastic. The main 1×6 slope element itself is new too.

On the main deck there is a luxurious restaurant, complete with a bar/lounge. Starting with the bar, which sits at the stern, we build a couple tables laden with drinks, as well as a stage covered in instruments. When I first started with the drumkit, I thought it was a great design and was excited for the finished product. However, I quickly realized the stage is far too small for a true drumkit, so it’s a little lackluster. No snare for this band!
I do think the “cake frosting” tablecloths are a nice touch, and I especially like the fancy liquor decanter build with the gemstone stopper making it look like crystal.

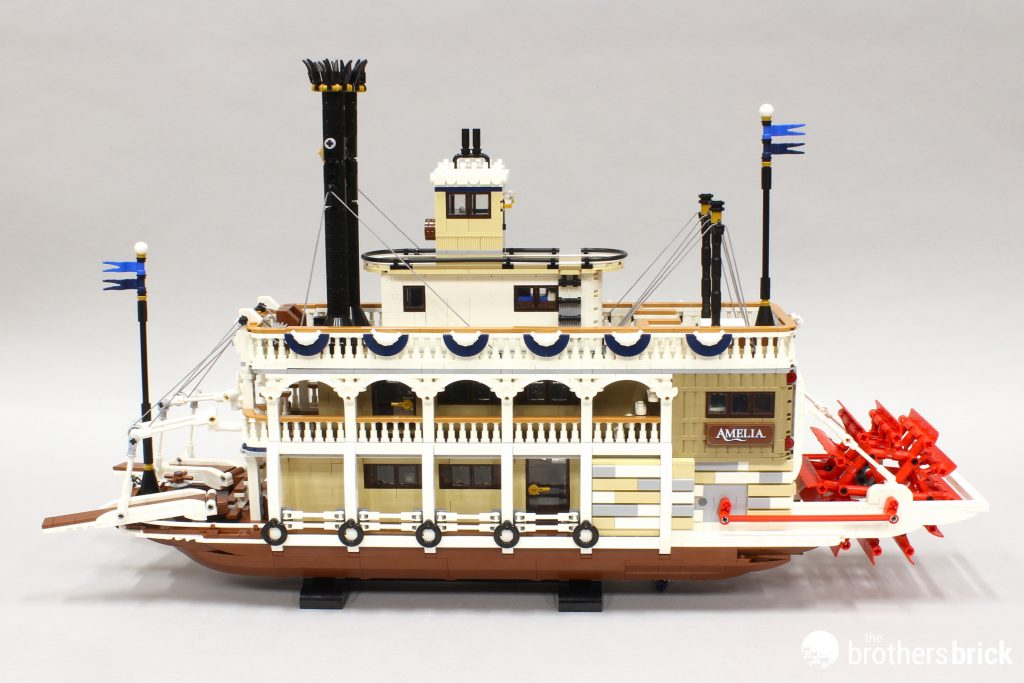
Like the other areas, we finish the bar area with plenty of windows and a unique wall texture. The rounded macaroni plates on the corners are new in dark tan. Thankfully, the nameplate for the boat is printed, with 2×6 reddish brown tiles on both sides. The name, Amelia, is paying homage to Aaron Hall’s daughter.


Moving along, it’s time to practice finger dexterity! The boat includes a whopping 176 telescopes for the railings. They’re not hard to place, but it can be a little tedious and tiring for you fingers. At least there’s a break between decks.

Perhaps the most tedious sections – but also the prettiest – are the two strips of arches that go above the railings. Small pieces layered in white-on-white on complex-shaped mudguards shifts the challenge from your fingers to your eyes. (Although maybe that’s just because I was building it at 2AM.) Fortunately it’s a repeating pattern, so once you figure out the first couple arches, it gets easier.

Before we finish the main deck, we add part of the railing for the Texas deck. This includes our first decorative croissant and dark blue banner accent. DOTS charm bracelet pieces have found new life here as the first pair of anchors for the string lines.

Back in the restaurant, we build a narrow, removable sub-assembly that will nestle into the middle of the boat. The smokestacks, which appeared in the galley, continue to work their way up the boat, sandwiched between a door and a decorative entryway. A little bit of fancy tile work is done for the floor, and we add our first steps of the stairways to the Texas deck.


From there, we quickly furnish the restaurant and build up the walls. Another of my favorite techniques in the model is the use of Technic cams for the backs of decorative chairs. Meanwhile, 4×4 plates are turned upside down with small panels acting as a tablecloth. Likewise, the things on top of the table are flipped as well, turning things like cones into cups, and a flower into a dessert.


Yet another technique I love is in the design of the light fixtures. However, I think a big part of that is simply owed to the lovely “light” itself, which is the satin trans (opalescent) mace head from the Dragonborn Paladin of the Dungeons & Dragons Collectible Minifigure series. The same bricks that hold these interior sconces also hold exterior “lights” using gems inserted into the new gold 1×1 round clips. While we’re at it, we add plenty of windows for the passengers to gaze at the water while they dine.

Between the stairs there is a narrow hallway that connects the restaurant to the lounge. In it, the other stickers are used as wall décor. This includes a generic menu and a poster of the “Breckin Band live on June 5th” on one side, and a painting of a lakeside sunset with the LEGO Ideas 21338 A-Frame Cabin on the other. With a little digging, I was able to learn that Aaron Hall’s son is named Breckin, and his wedding anniversary with his wife is June 5th. The band’s logo, a cardinal perched on musical notes, is a nod to his home state of Illinois, USA. I wish that these details were a little more readily available – across all models – because getting that insider info makes sets all the more charming.


While very unassuming at first glance, one of the most important elements in the entire set is a new 5L Technic connector. Used twice, this new element has a standard axle connection on one end, and a loose connection for the rest of its length (similar to LEGO CV joints if you’re familiar with Technic). This allows the sections of the boat to be easily removed and replaced.

With the restaurant and bar/lounge complete, we carefully slip the section into its nest on the main deck. It’s interesting and kind of cool how the outer deck remains stationary and secure.

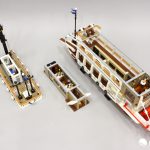
Sliding what we’ve built so far to the side for a moment, we now begin work on the Texas deck. What is a Texas deck, you ask? In the 19th century steamboat era, the officer’s quarters, including the captain’s cabin, were generally the largest and housed on the same deck. Texas was the largest state in the US at the time, and therefore the deck adopted that name. This particular deck starts with a basic footprint that includes lots of tile and the bases of the smokestacks.

The next couple bags see us through building the bunkhouse and the bathroom. I have a bit of a love-hate relationship with this section. The bathroom, completed first, is excellent all around, with lots of nice features and a spacious layout. It’s great, but almost… too great… It follows the narrative of a renovated steamboat tourist attraction versus going back to the 19th century, so I’m fine with the updated look. What bothers me is that the cabin is so sparse in comparison. This may be the Texas deck, but these certainly aren’t the captain’s quarters. I know there’s not a lot of space to work with, but shifting the wall over one stud and adding a dresser or something would have been nice. When you build this great bathroom and shift to the unremarkable crew quarters, it’s a bit of a letdown.


I have a couple more notes to add regarding the bathroom. I don’t recall seeing a soap dispenser in a model before, and I think it’s an excellent idea and parts usage, consisting of a trans-blue Bionicle eye. Also, I love the use of a minifigure pen as a faucet. The only thing I don’t love about the bathroom is the drab sticker used for the mirror. LEGO has produced plenty of chrome reflective stickers. Why did they choose a barely-reflective flat silver sticker here? Or, dare I beat a dead horse, why not a printed tile that at least looks right, like the mirror in the modular LEGO 10297 Boutique Hotel?

Wrapping up the rooms, we close up the walls and add a couple doors. Rather than stairs, dual ladders lead up to the pilothouse. Rigging masts (or possibly small escape stacks) at the back will hold the string line with more DOTS charms.

The giant smoke stacks make a bold statement! They stand over 20 bricks tall including the crowns. Central axles make them quite sturdy, and then they are reinforced by the string line. A Ninjago hat in gold makes for a nice accent, along with the octagonal frames for the crowns.

Finally, it’s time to place our first string line. They both have their lengths labeled on the box. This one is 1750mm/68.90in.

Plates with bars slotted through axle bricks hold the line taught. The length is more than enough to cover the distance it needs to travel, so there is a bit of excess.

The instructions conveniently have the line laying flat. Unfortunately, our line in the real world doesn’t quite want to behave. Once tucked behind the railing, though, it doesn’t look bad. Speaking of which, next we get to practice our dexterity again by placing 74 telescopes. Additional banners with croissant accents and a medium nougat banister complete the look.

Our boat is topped with the pilothouse deck, which is wrapped in rigid hose. The tiny building houses a steering wheel terminating the lengthy driveshaft for the rudder. It’s pretty incredible that initially steering wasn’t involved in the design, but the final product features a pretty impressive amount of engineering to achieve the feature. At the end, even with the minor function of rotating back and forth a few degrees, it’s definitely worth having it as part of the build process.

With the roof, a couple pipes, the door, and exterior lights, we’ve reached the summit of the model. We’re now on the home stretch, but we’re not done yet!

This would not be an iconic steamboat without the giant red paddlewheel. This consists of three supporting spoke rings holding Technic panels. The larger of the two Technic connectors used for the rings is new in red. The whole thing is connected to the main mechanism via long Technic linkage elements.

On the opposite end of the boat, we add our second string line. This one is 660mm/25.98in long.

The line connects to a pair of boarding stages and a winch mechanism allows you to raise and lower them. They also have the ability to swing outward for whatever angle you approach the dock. To finish things off, we add a couple flag poles and an anchor attached to a chain spool.

The boat is now complete! The only thing left to do is make the stand. There isn’t really anything special about it other than having clean lines. But it gets the job done!

The completed model
Beauty is in the eye of the beholder, however I think this model sure is pretty to look at! I love the level of detail exhibited at from every angle. In many ways it holds true to Aaron’s original submission, however, I appreciate the changes. The narrative of a modern day world where an old boat has been refurbished and turned into a floating museum is great. It brings it to a place where you can envision yourself going on one of these excursions.


As a big fan of mechanisms and builds that move, I also appreciate the numerous play features and things to look at. While this is a model for adults to display, is certainly has enough play features to compete with sets made for kids. From the paddlewheel…

To the rudder…

To the boarding stages… No opportunity for movement is left out.

Notably missing from this set are minifigures. Most of the time, things that are minifigure-scale actually come with figs. In fact, while I’m sure someone can recall one, off the top of my head I can’t think of any minifig-scale models without accompanying figs. I’d venture to guess that some of the reasoning was the cost associated with minifigs on top of such a complex model. Perhaps there was also the thought that it didn’t really need figs to shine. But I’d bet money that part of the exclusion of figs is to distract from the fact that much of the interior parts of the model are VERY tight. Plenty of models have areas that don’t allow a lot of room for figs, but this one really pushes the limits. There also aren’t studs to anchor the figs to. However, I’ll take the level of detail over the figs, personally.

Conclusions and recommendations
So there you have it! We’ve had our adventure and it’s time to head to the dock (or shelf). My impression of this model is largely positive. While I have a few gripes, the biggest is QC of the damaged part, and that’s not entirely reflective of the set. Yes, it’s a “buyer beware” situation, but it shouldn’t detract from the beautiful work and collaborative effort put in by the designers. Overall I truly enjoyed the process and will display it prominently even though I’m not someone who gravitates to boats. Below you can see the fan submission compared with the final model.


Prices will continue to bother folks, but I think this one is a good value for your money. You’re not just paying for a model, you’re paying for the fun, captivating experience that goes along with it, and this one definitely delivers. From start to finish it’s never dull. I’d recommend it to boat enthusiasts, hobby historians, and anyone else who is seeking something playful yet sophisticated, interesting, and mildly challenging to relax with.
LEGO Ideas 21356 River Steamboat will be available to LEGO Insiders April 7th and everyone else April 10th, retailing for US $329.99 | CAN $429.99 | UK £289.99. You may be able to find it from third party retailers on Amazon and eBay.
The LEGO Group provided The Brothers Brick with an early copy of this set for review. Providing TBB with products for review guarantees neither coverage nor positive reviews.


The post LEGO Ideas 21356 River Steamboat – A brick-built voyage [Review] appeared first on The Brothers Brick.