I don’t know if they have heirlooms in Star Wars, but if they do, the Slave I is surely one of the bounty-hunting Fett family’s. It made its first appearance in the Empire Strikes Back as Boba Fett’s ship, but Attack of the Clones revealed that it had once belonged to his father, Jango, albeit in a different paint scheme. The former has made up the bulk of the ship’s LEGO appearances, including a much-loved Ultimate Collector Series edition released in 2015. Ten years on, it’s the Episode II version that is getting the same treatment, in the form of 75409 Jango Fett’s Firespray-Class Starship, containing 2,970 pieces. Release is slated for this Star Wars day (May 4th), with a retail price of US $299.99 | CAN $379.99 | UK £259.99. Is it worth a detour to Kamino? Strap in, let’s find out!

The LEGO Group provided The Brothers Brick with an early copy of this set for review. Providing TBB with products for review guarantees neither coverage nor positive reviews.
But before we go on – let’s remind ourselves of what made this rendition of the ship so memorable, shall we? Grace your ears with this: the best sound in Star Wars, bar none. (Eat your heart out, Wilhelm scream.)
The box and contents
The box is vertically presented, showing the Slave I in flight. Although the box I received is adorned with the name “Jango Fett’s Starship” in the top-left corner, the set name on LEGO.com is listed as “Jango Fett’s Firespray-Class Starship”, so perhaps it’s had a late change.

The ship’s stand is in evidence on the reverse, along with a reference shot and some alternate angles.

The box is another two-part one that we’ve become accustomed to seeing in these big sets. Inside, most of the near-3,000 pieces are contained within 23 paper bags. Some of the larger Technic beams and the information plaque are in their own plastic bag. There’s one more paper bag containing the large cockpit piece.


The instructions and sticker sheet get their own envelope, too. There are two booklets included.

At the start of the first one, there are no fewer than ten pages of information, mostly centred on the ship. Conspicuously absent is the ship’s name, Slave I, although its origins on Oovo-4 are acknowledged herein.


The build
It’s Technic bricks aplenty as we start off with a strong frame for the bottom of the ship. There’s a good number of studs-not-on-top (SNOT) bricks too, though.

A large dish elements allows us to get our bearings – that sits at the top end of the ship.

To close out the gap at the bottom, there’s a sub-assembly with studs pointing every which way. There’s going to be plenty of this around the outer edge as this is where much of the hull panelling will connect later on.


In fact, our first little splashes of colour come at the end of bag four in the form of some sand-green parts.

External panelling is the name of the game for the next three bags. In two of those, we get a bunch of new parts and re-colours. Almost all the elements you see below are new moulds. The only exception are the pair of 1×10 dark blue slopes, but these are making just their second appearance in this colour here.

Before we use those, there’s a clever technique for stud inversion on the underside of the ship with click hinges attached in opposing orientations.

To recreate the Slave I’s egg-shaped silhouette, we’re going to need a fair few hinge pieces, used in a variety of sub-assemblies. This is the first such one, showing a hinge hidden inside.

This connects to the main ship on its side. First it’s clipped in at one end, before the other end – the one nearest the camera below – is connected. Then it can be shaped around what we’ve already built. You’ll notice we’ve applied our first sticker, too, onto one of the sand-green 4×4 slopes.


A similar technique is used with the 1-wide slopes smoothing off the outer face. Check out how the angles allow for the cheese slopes to match up. Yeah, that’s satisfying. Chef’s kiss!

Then it’s up to the other end, and it’s same-same, but different. The assemblies are a bit bigger this time. It’s no less satisfying to line up, though. The LEGO geometry used to fill everything in is fascinating!


The outer ovoid shape is now done, so now we need to fill it in. A couple of Technic wheel arch peices make a surprise appearance around the ship’s thrusters.

Is it just me or does that yellow engine glow give off Majora’s Mask vibes?

Anyway, now that’s done, we can finally turn our build the right way up and get a good look at how those curves line up.

And then we can build on it even more. After all that SNOT work, this bag is much more conventional. The only technique of note is using a tow ball joint to attach the sand-green wedge plate at the front.

Setting the main build aside for a moment, bag 10 is dedicated entirely to a large structure comprised mostly of Technic beams. This provides a strong platform for the extended ‘nose’ of Slave I. It’s difficult to see from the pictures, but it is placed at a very subtle angle to the main plane of the base.


You can kind of see that angle here. Using those 1×2 Technic bricks as the link does mean they can be used to connect stuff in the correct plane, but man, are they a pain to push in. It’s getting quite crowded down there now!

We cover up some of this internal mish-mash with another sequence of sand green slopes.

From there, we jump back to the bottom of the ship to add a bit more to the central section. To start with, we shore it up with this assembly with a curious combination of Technic liftarms.


Their purpose becomes apparent shortly afterwards with the addition of the entry ramp. It’s connected with Technic axles at the top, and clips at the bottom.


With the side panelling yet to go on, we can get a good picture of how the mechanism works. It’s very impressive! The white liftarms double as the door when it’s closed up.

Since that gives the Slave I’s passengers access to the interior, we might as well build them one, right? The back wall is first up. All those sideways studs will be useful for attaching more rounded hull bits.


With that slotted in, we set to work building up around it in bag number 14. Plenty more curved slopes and tiles combine here. The blue cylinder you can see is a bacta tank, hidden behind the panel walls in case Boba gets a boo-boo. Or Jango too, I suppose.


More interior follows with a lower deck; I believe this is the first time this has been represented in a LEGO Slave I. Unlike many other versions of the ship, though, it doesn’t rotate with the wings on the side.


Speaking of which – we’ll build part of those next, after a break to put on some more curved slopes. This little assembly is the first to be made…

… And it slots in next to the cockpit. Dark green rounded slopes give our spaceship a bit more heft. wWith those in, the cockpit walls go up. I always love seeing cheese slopes aligned with the correct half-plate offset, and in this case it allows for a curved 1×4 slope to sit flush across the top. Once again, very satisfying slopework!


The base of the Fett flyer is now pretty close to complete, and over the course of the next couple of bags (numbered 18 and 19) the nose will become so too. First off we connect a small 10-tooth gear. Initially I thought this would turn into some sort of auto-levelling mechanism for the cannons, but it’s just to provide extra friction to stop them from flopping all over the place. Simple, yet effective.

From there onwards, it’s all about the panelling. The section closest to the cockpit is connected with Technic hinges…


… While the section further forward makes clever use of a rubber Technic bush attached to a 2×2 plate with bar, which you can just about make out in the right-hand photo. The bulk of the weight is taken up by a more sturdy connection further up – this is just to lock in the angle of this particular section.


Here’s how it looks from the side, with some additional closing panels and cannons also attached.

I’d almost forgotten we haven’t yet made the driving (flying?) seats! Unlike the lower deck, this section is removable. It sits on a couple of rail plates.


Then, we can finally open up the bag containing the windscreen element. This is the same one as created especially for the previous UCS Slave I. We do have some stickers to put on it, though. Stickers on windscreens? Not a fan.


We’re on the home stretch now. The final part of the ship itself to go on are the wings on either side. There’s a neat trick to create one of the angled parts: a tile on a hinge plate is wedged in on the underside.


The wings do rotate when the ship transitions to flight mode. They pivot around the axles we connected way back in bag 4. A stay provides a touch more rigidity.


That’s the Slave I done – or should I say, Jango Fett’s Starship. We only have a couple of elements left, the first being the stand and its information plaque…

… And said plaque makes no reference whatsoever to the Slave I nomenclature. And I’m left wondering… Why? This is probably the most well-known ship name in Star Wars outside of the Millenium Falcon. Not including something as basic as its name, in an 18+ set ostensibly all about the details, is a conspicuous omission.

Now to be fair, this doesn’t appear to be a LEGO-only thing: it’s also absent from the StarWars.com databank entry, so one has to assume it’s based on guidance received from the licensors. Still, it feels a little contrived to me to not once mention such a key part of this ship’s identity, particularly one that’s already so well-known.
We still have the seismic charge to build, and I’m going to go from one rant to another here. There are no fewer than five stickers on this 11-piece build, across a round tile and the 2×2 cones on either end. Lining these up really sucks. They’re elements that are frequently printed in other sets, which only makes it all the more frustrating.

That wasn’t a particularly nice note to end the build on, was it? Let’s have a pick-me-up…
Ah, that’s better. Now, shall we look at the minifigures?
The minifigures
He’s just a simple man trying to make his way in the galaxy – and Jango Fett looks great! He’s fully decked out with his armour, two pistols, and a hairpiece for when he’s not in full Mandalorian mode. Young Boba also looks the part, although I’m not convinced that hairpiece is the best one to represent Daniel Logan’s luscious locks.

Watch out for those wrist rockets! Jango has arm printing depicting the full extent of his armour. The printing extends to the back on both figures. They both have alternate frowning faces, too. This is the original angry clone face!

Of course, Jango wouldn’t be a Mandalorian without his helmet and jetpack. There’s an all-new rangefinder element that lines up a bit better with the helmet’s visor than the part included in some clone trooper sets. It’s a shame Jango’s jetpack isn’t moulded in flat silver to match the helmet, but it does match the colour of his torso pretty well, so it doesn’t stick out.

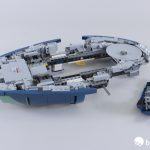
The finished model
I don’t have a copy of the original 75060 UCS model, so I’m going to rely on our Chris’ review of the set for comparisons. That set received a lot of plaudits at the time and is still remembered fondly by many. But with a decade’s worth of new techniques and curved elements, I do think this version looks superior. It certainly looks great in isolation!

It’s nice that the stand leaves the back exposed, too. Although not as clean as the front, it’s still pretty detailed. It’s great for showing off how the Slave I’s many curves are achieved. The designers have absolutely nailed its ovoid silhouette.

And, of course, we can see the seismic charge from here too. You can display it next to the ship as the box suggests, but with no space on the stand it has to just sort of sit there.

That’s something that affects the minifigures, too. There isn’t any space on the stand to display them, which feels like a miss to me – it would’ve required maybe a half-dozen extra parts. At least ther’s plenty of room to sit inside, right?

Well, kind of. Jango can’t sit down with his jetpack on, so you need to remove his armour. But there isn’t anywhere to store it inside, so it has to sit on one of the empty seats. Even if he could sit down, there’s nowhere for his hairpiece to go either. His blasters can be stored next to the Bacta tank hidden behind the cockpit wall, so it’s a bit puzzling that there wasn’t any provision made for his other gear.


Coming back to the ship itself, the only flaw I noticed is also around the cockpit area. When the ship is in flight mode, there’s a noticeable gap between the top of the windscreen and the hull. This is caused by the weight of the nose section; this is only connected to the rest by the Technic structure in the middle, remember. As a result, its weight pulls the windscreen away from the rest of the ship slightly. It remains to be seen if this gap will get worse over time.

But other than that – no notes; it’s a very well-designed model. For fun, I dug out my copy of 75333 Obi-Wan Kenobi’s Jedi Starfighter to see how the two compared. Despite the size difference, I was surprised to find out they’re not a million miles out from being in scale with each other; certainly well within the broad definition of minifigure scale. It goes to show just how big Slave I really is in-universe.

While Obi-Wan’s starfighter is nominally a playset, it’s still a very faithful model, particularly when you apply Ron McPhatty’s simple mods as I have done here. (It’s also a great set in its own right, for what it’s worth). Consequently, the pair look great together. I wouldn’t try recreating their chase through the asteroid field, though. Yes, I did try to swoosh Slave I, and no, I wouldn’t recommend it – at least not with one hand!

At the time of writing, 75333 is still for sale. Price gulf notwithstanding, it’s really nice to have most of the main characters from Attack of the Clones’ Kaminoan act on shelves at the same time.

Conclusion and recommendation
But enough of comparisons with other sets. How does 75409 stack up as an Ultimate Collector Series entry in its own right? Well, the ship itself is superb – it’s so well shaped. The figures look just as good, Jango especially. At 300 dollars, it’s one of the more expensive of the May UCS sets, certainly by recent standards. Then again, it’s also got more pieces than many of them, and 2,970 pieces for 300 bucks is not bad going for a Star Wars set.

The downsides are the windscreen gap, the lack of display slots for the figures, and those blasted stickers on the seismic charge. I’ll give LEGO a pass on the not-calling-it-Slave I thing, perplexing as it is, as I suspect it wasn’t a LEGO-driven decision. Other than that, I can’t really find much to fault about Jango Fett’s Starship. It’s an excellent design, fairly priced (if expensive in absolute terms), and with two great minifigures to boot.
And the whole time building it, you’ll be thinking of the seismic charge noise in your head, which can only be a good thing. Once more with feeling, folks…
LEGO Star Wars 75409 Jango Fett’s Starship contains 2,970 pieces and two minifigures, and releases this May 4th. It can be pre-ordered now for US $299.99 | CAN $379.99 | UK £259.99.
The LEGO Group provided The Brothers Brick with an early copy of this set for review. Providing TBB with products for review guarantees neither coverage nor positive reviews.
Check out our full gallery of pictures:


The post LEGO Star Wars 75409 Jango Fett’s Starship: The Starship Who Shall Not Be Named [Review] appeared first on The Brothers Brick.