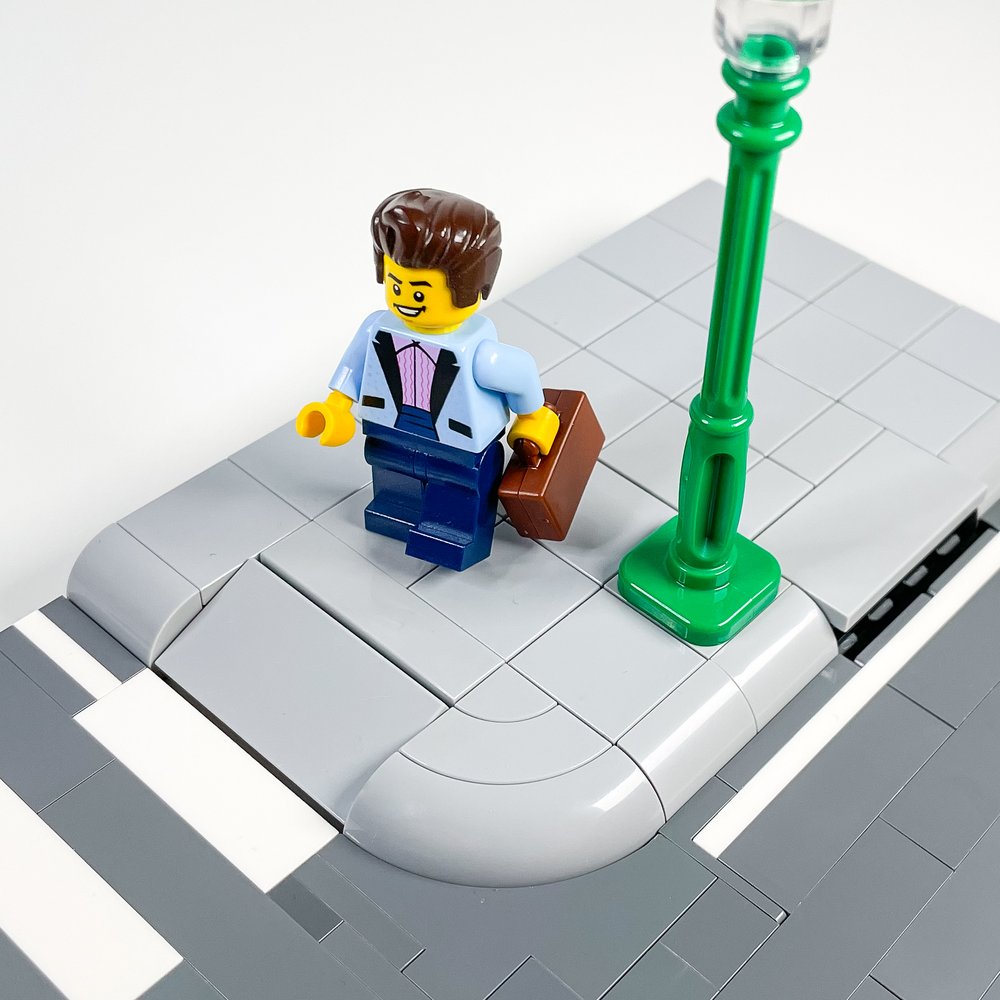
Curb Appeal: Building Curved Sidewalks for Your LEGO City
Best of BrickNerd - Article originally published October 6, 2022.
Creating cityscapes has been a love for AFOLs since the very beginning of the brick and a staple of Miniland at any LEGOLAND across the world! It is no wonder the City theme continues to remain in the top five-selling themes for LEGO every single year. If I had to guess I would say it is because these cities closely mimic real life, or like any themed build, creates an imaginative world that pulls us in.
I don’t personally have a cityscape, yet. But, this doesn’t stop me from imagining how I might construct one and really get into the finer details such as sidewalk and curb details. Today’s article is all about curb construction, and more specifically, how the introduction of a new element might change some aspects of that.

LEGO City by OliveSeon
Street Level
While the architecture and other structures certainly provide a lot of eye candy, my view is often drawn to the street level of these cityscapes. This is where the story is set for our beloved minifigures. As you might expect, AFOLs typically give a great deal of thought to how to construct their roads and sidewalks. After all, a great city is built upon a great base!
When it comes to the roads, you have several options: the classic 32x32 road plates, the newer 16x16 road plates, or the more custom and parts-intensive MILS roads which can be built with both brick laid on its side or the 8x16 tiles.


Where the Sidewalk Begins
Whichever road system you choose, your next step is determining sidewalks. Luckily, the introduction of the Modular line from LEGO gave us a good standard for just this thing. The Modulars all sit on a baseplate (most on 32x32) and most commonly have a tiled sidewalk. When paired with the classic road plates this resulted in a sidewalk that is 1 plate high above the street.

Modular building standars from Pascal’s Bricks
More and more AFOLs began to experiment with detailed roads utilizing the Multi Road System (MILS) which typically leads to a sidewalk that was 2 plates above road height.

Even utilizing the newer road plate system has resulted in curbs that are 2 plates high. The details are really left up to your imagination (and available parts!) at that point. Often you see experimentation with curved corners using the traditional tiles we have available.


Or even experimentation with wedge plates to create a large curved edge, such as this version from Tiago.
Curves Ahead
The thought of beginning a small cityscape, or at least a small vignette of sorts, entered my mind over a year ago which is when I started experimenting with curb options. I really wanted to strive for a different design with a little more realism, yet stay at the 2-plate height above the road. Pretty quickly I started with curved slope combinations utilizing part 37352 and part 6081 in dark bluish gray, and added some other details along the way. For those first iterations, I used the newer 16x16 road pates, which easily allowed lots of flexibility to get the curb to the right height.

The feedback I received was very positive, and even prompted others to share it on YouTube. But, as I built on further and came to an intersection (literally), this is where the design started to present problems. At the time I started there were a couple of curved corner slopes available like 67810 and 65617, but either not in the correct color, or no way to really make them integrate seamlessly. This halted the project for more than a year until a recent new element changed that!
An Arch To The Rescue!

The release of Lion Knights’ Castle 10305 brought a handy new arch element, part 80543, which results in an inside curve of 3x3—perfect for pairing with 3x3 round corner 65617 and a brick-built road with the new element.

I am more than pleased with the result, and it has reinvigorated my desire to create a city vignette! It results in a very clean look and a touch of realism to the street. I also enjoy sharing that inspiration with others to see where they will take it, and today BrickNerd is sharing the step-by-step process, on how to use the new 1x4x3 arch element 80543 in a MILS brick-built road.


This solution can integrate with your MILS system as well.

Hopefully, this curved solution will add a bit more curb appeal to your city layouts. The introduction of the new arch may not solve every design solution just yet for these rounded curbs, but it really opens up a lot of new possibilities for styling your city streets!
What do your curbs look like in your LEGO city? Let us know in the comments below.
Do you want to help BrickNerd continue publishing articles like this one? Become a top patron like Charlie Stephens, Marc & Liz Puleo, Paige Mueller, Rob Klingberg from Brickstuff, John & Joshua Hanlon from Beyond the Brick, Megan Lum, Andy Price, Lukas Kurth from StoneWars, Wayne Tyler, LeAnna Taylor, Monica Innis, and Dan Church to show your support, get early access, exclusive swag and more.

