A Study In Perspective: The Light of the North Pole
Today’s guest article comes from Josh Parkinson, a LEGO builder specializing in forced perspective. He shares with us the final build progression and lighting of his North Pole MOC.
It was five months since my interview here on BrickNerd, and I had just completed the next major section of my largest build yet, The North Pole. I now had the elf workshops, the foreground foundation built, and the microscale background landscape done (check out Part 1 for the full details). Things were coming together and moving along smoothly.


Next up was finishing the foreground trees, building the backdrop, lighting it, and bringing it all to my first LEGO convention, BrickCon.
But it was time to put the North Pole MOC away for a bit as I was about to head out on a warm Southern California road trip for my birthday. I had several months before BrickCon—plenty of time, right? Well, I failed to anticipate I wouldn’t be back to building much of any LEGO for another three to four months with what was about to happen in my life next...
That Time When Life Stopped
Almost immediately after returning from my birthday trip, my partner got COVID, my parents got COVID (even though they’re 2,000 miles away), and then my dad went into critical care for heart failure. Ya, everything pretty much stopped. I was buying another ridiculously overpriced plane ticket. A one-way ticket turned into four weeks away from home, and I was anxious and uncertain about what would happen. All while my dad was getting on the heart transplant list while being stuck in the hospital in a tangle of tubes and wires as he recovered.
It was a stressful, life-stopping, uncertain time, but in some ways, a meaningful one—and one spending more time with my family than I have since I moved to Seattle. I didn’t have the bandwidth to do much besides building sets. The months went by. I ended up bowing out of Bricks Cascade, which would have been my first LEGO fan convention (but it became another one I missed).
Finally, some good news came. My dad received a good transplanted heart and started the long process of recovery. After a few uncertain months, I was finally home for a bit. Things were looking more positive. It was time to start making my way back into MOC-building.
I got a chance to do my favorite habitat challenge, the Disney habitat challenge put on by Jen and TrickyBricks. Habitats was where I started as a builder and is still my favorite to do each year. Habitats are great for times like these: they don’t take a huge investment of time and attention—both of which I still had in limited supply! Again, I built it as an integrated stack, not as elaborate as some of the others I’ve done lately, but still almost indistinguishable as individual habitats.
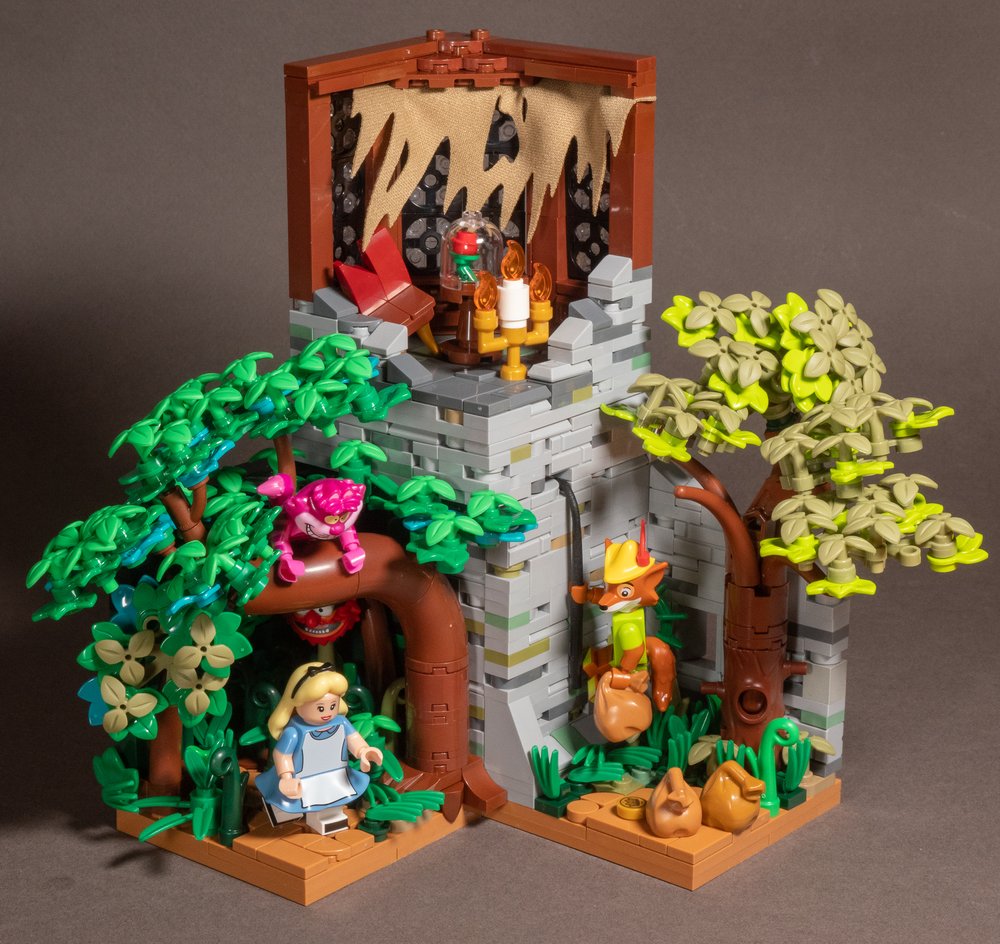
Disney habitats stack with Alice in Wonderland (Animal’s head to represent the puffball flowers she’s running from), Robin Hood, and Lumiere and the rose from Beauty and the Beast.
I wanted to bring together three disparate characters in a way that the whole thing seemed cohesive and could be in the same world and place.

Lumiere and the rose from Beauty and the Beast with some lighting effects to heighten the mood of the scene
I went with Alice in Wonderland, Robin Hood (so happy for that minifigure!), and my favorite and most artistic and emotional habitat, Lumiere and the rose from Beauty and the Beast. All three had lots of fun parts usage, including Animal’s head as the Wonderland puffball flower head, torn sails as ripped curtains, a minifigure tree costume, and others. (Disclaimer: No LEGO elements were harmed—the sail was created to look torn like that!)
The North Pole MOC waited patiently for the day I’d finally return to it.
In the meantime, Dad got out of the hospital finally, and we had a trip to visit for a couple weeks. I even stopped by BrickWorld Chicago for a day as a public viewer. Mostly, the summer became a time of getting back time with my partner, getting back to my business, summertime events and trips, and another SEALUG showing in the community.
I later continued what I started with the Disney habitat challenge for the CMF habitat challenge. I made a similar style stack that would seamlessly integrate with the Disney stack. This time with the magician, the bard, and the falconer.
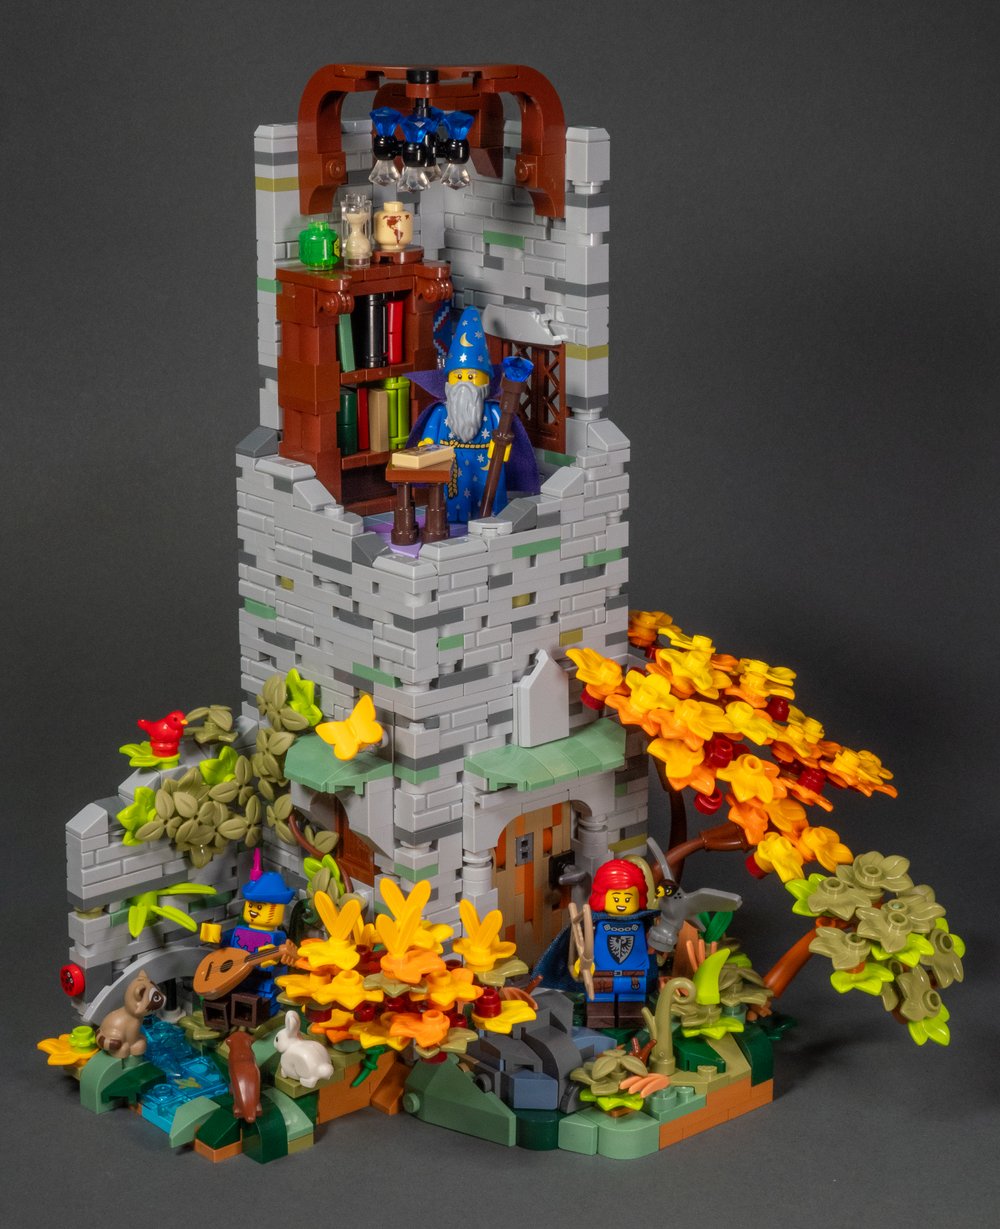
The final stack for the CMF habitat challenge.
Which also seamlessly connects to my earlier Disney habitats stack!
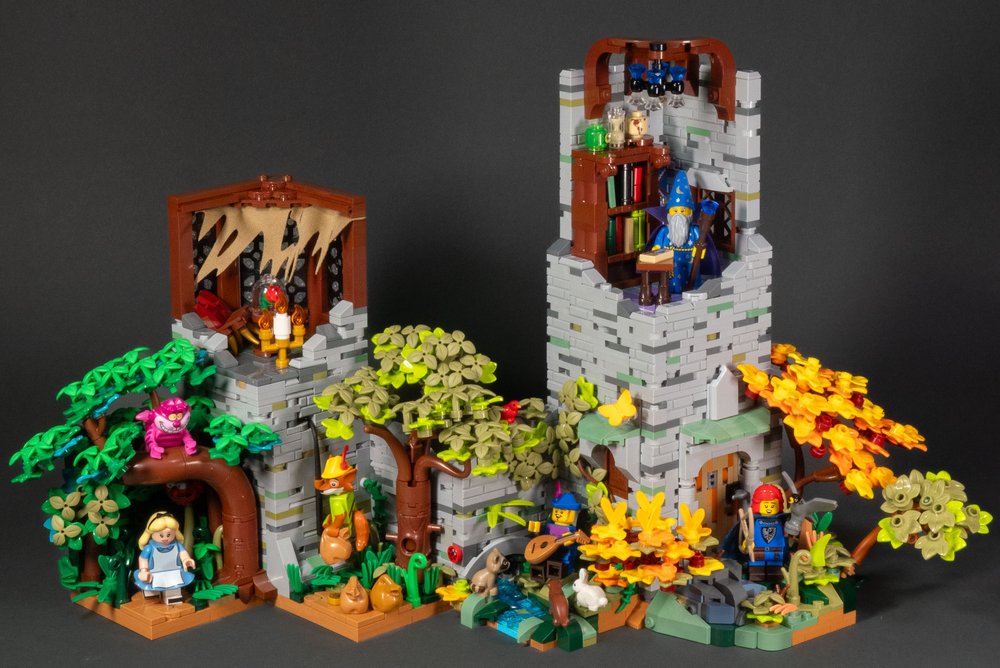
All these little projects were completed in short bursts as I worked on getting my normal life back on track. Again, habitats are great for doing quick creations full of detail with a complete MOC in the end.
Before I knew it, it was August and I was panicking a little. If you’re wondering why… September 7th was BrickCon, my hometown convention and what would finally be my first full conference as a displaying participant. Finally! But my biggest new MOC for the con hadn’t been touched in months.
Stage 5: Raise the Backdrop, Turn On the Lights, On With the Show
The days were ticking down to BrickCon. My North Pole MOC was not at all complete. I was running out of time fast - the story of my year. I had a lot of progress, but I still had a lot to do:
The foreground trees were not built.
The sky backdrop was not even started.
I still wanted to incorporate light effects somehow.
I also had to get ready for my first con with everything else I’d built in the previous year and a half, making sure I could power and display my MOCs and get my first brick badge together and onto some kind of lanyard.
The ticking clock was exactly what I needed to start working on the North Pole again. With less than a month to go, I was diving into completing the trees in the foreground. I had the parts and was doing the repetitive drudgery of building dozens of boughs to fill out four large trees.
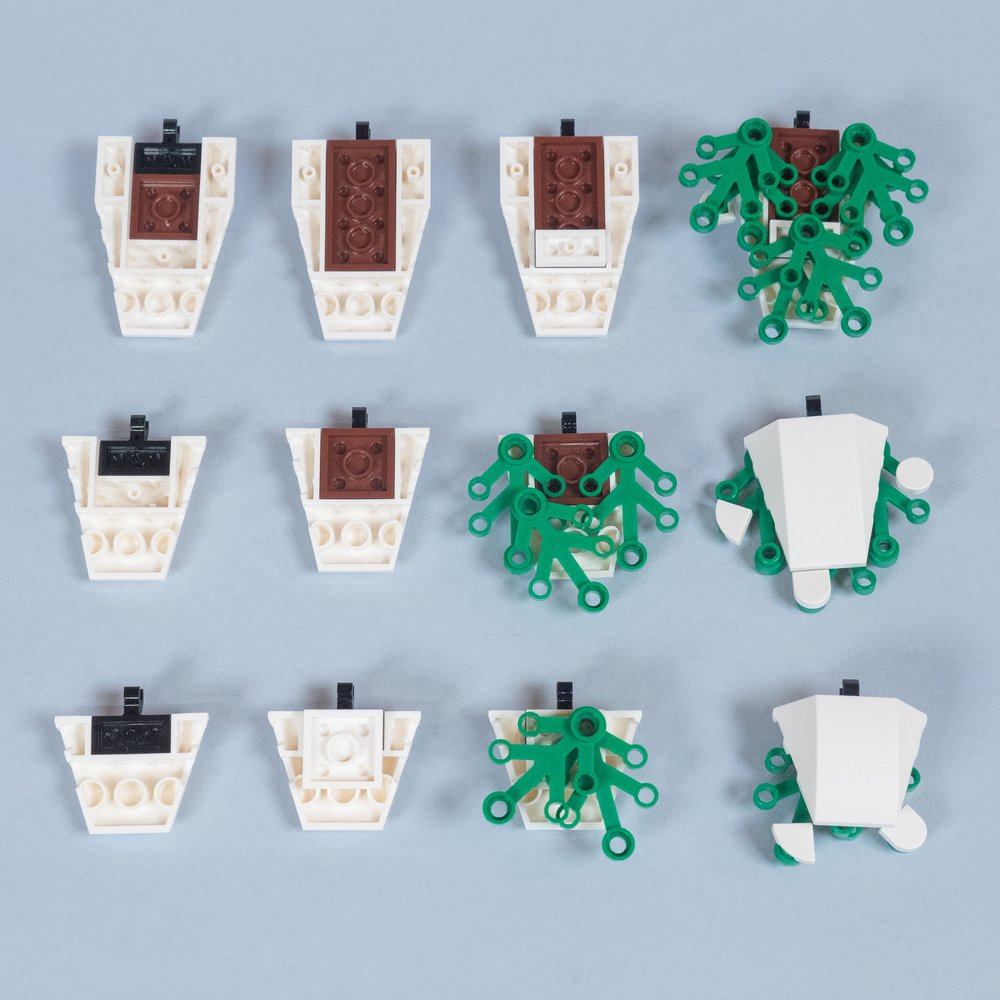
Sampling of how the boughs are made.
The cores use an axle with a combination of 2x2 rounds, steering wheels, and octagonal bar plates. The base is sunk into the landscape.
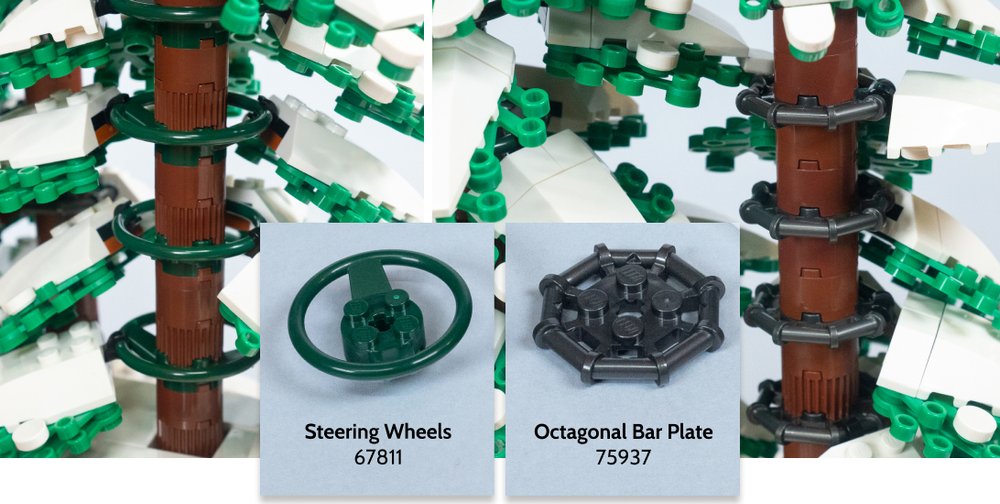
Tree core examples.
I soon realized I didn’t know how I was going to taper down to a point at the top. So I had to quickly come up with a solution for the top of the trees to transition from the boughs to the pointy top.
View fullsize
View fullsize

With that done, it was on to figuring out the backdrop. I knew I wanted to put a light effect behind the mountains at the horizon for the “lights out” portion of the con. So I built a base that would go behind the background landscape and still have space for a strip of LED lights.
I tried different combinations of blue colors for building the sky and settled on a Medium Blue and Light Royal Blue combination. I was really feeling that softer, slightly less saturated blue look to go with the rest of the look and feel. I tested it out with a short portion of sky and light aqua skyline mountains to start with (light aqua to get that haze for distant mountains).
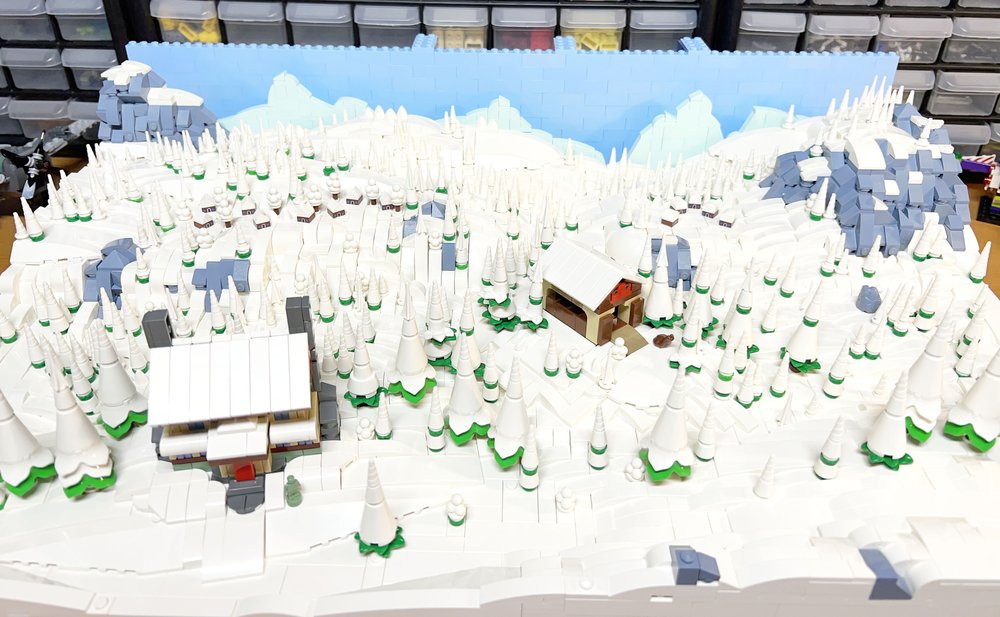
Figuring out the backdrop.
I also needed to figure out the horizon light. I wanted it continuous and found the LEGO specific lighting options insufficient and expensive for this. I ultimately found continuous LED light strips on Amazon with a USB connector for pretty cheap. I could even cut it to any length I wanted and plug it into a power bank if I didn’t have an outlet. Perfect!
I built part of the sky and the channel for the light. Then I installed the lighting and tested it out. As you can see, it was magical and worked wonderfully.

Testing the light strip
I even buried a good amount of the strip in the base so I didn’t have to cut too much off, figuring I might use it in a different MOC someday. Unfortunately that kind of bit me in the ass a bit since powering it from a battery sucked up a lot more power than necessary. Always learning!
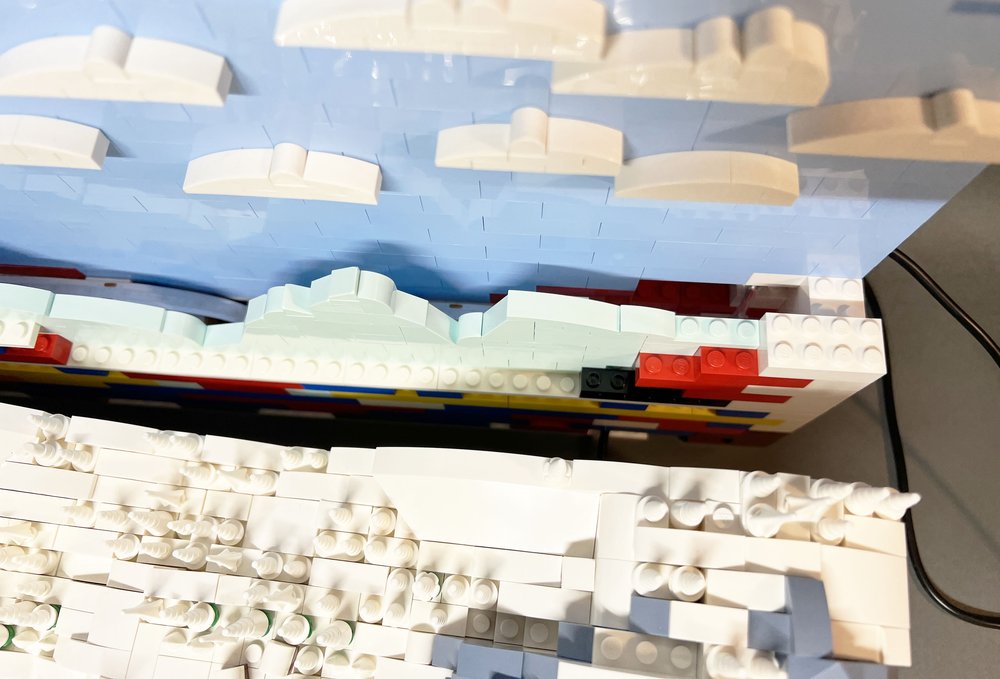
Detachable backdrop with a view down to the LED light strip behind the back mountain skyline.
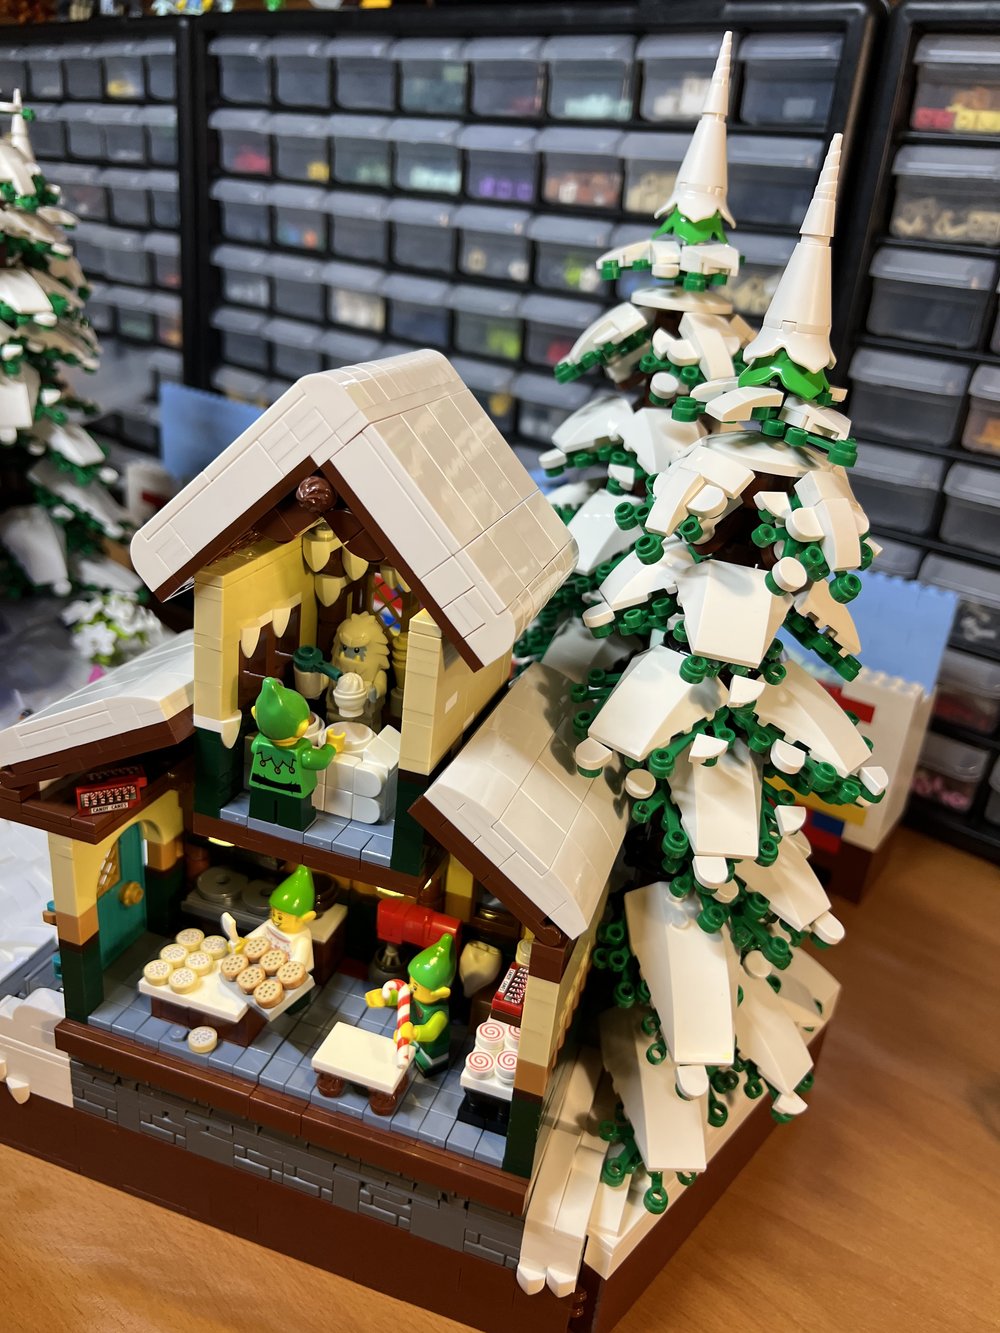
Lighting the workshops.
As it happens, I had to wait for some more blue elements for the sky to arrive to finish, so I went to work on the rest of the lighting (while anxiously wondering if the parts would even arrive in time), The workshops were fairly simple to light—the wiring through the base was the more difficult part.
Then I thought of something… Santa’s cottage needed some light. I went back and forth on that, because I also realized I completely plated off below the snow using solid 16x16 plates. I would have to tear up the landscape to pull out the big plates and create a hole for wires to go through. Not good at all.
I debated and debated, tried different lights, tried to convince myself it shouldn’t have light anyway… and then the art won out. It needed lighting. I knew it did. I was trying to find an excuse to avoid it. I was going to have to dig up the base and work in an access hole. Crap.
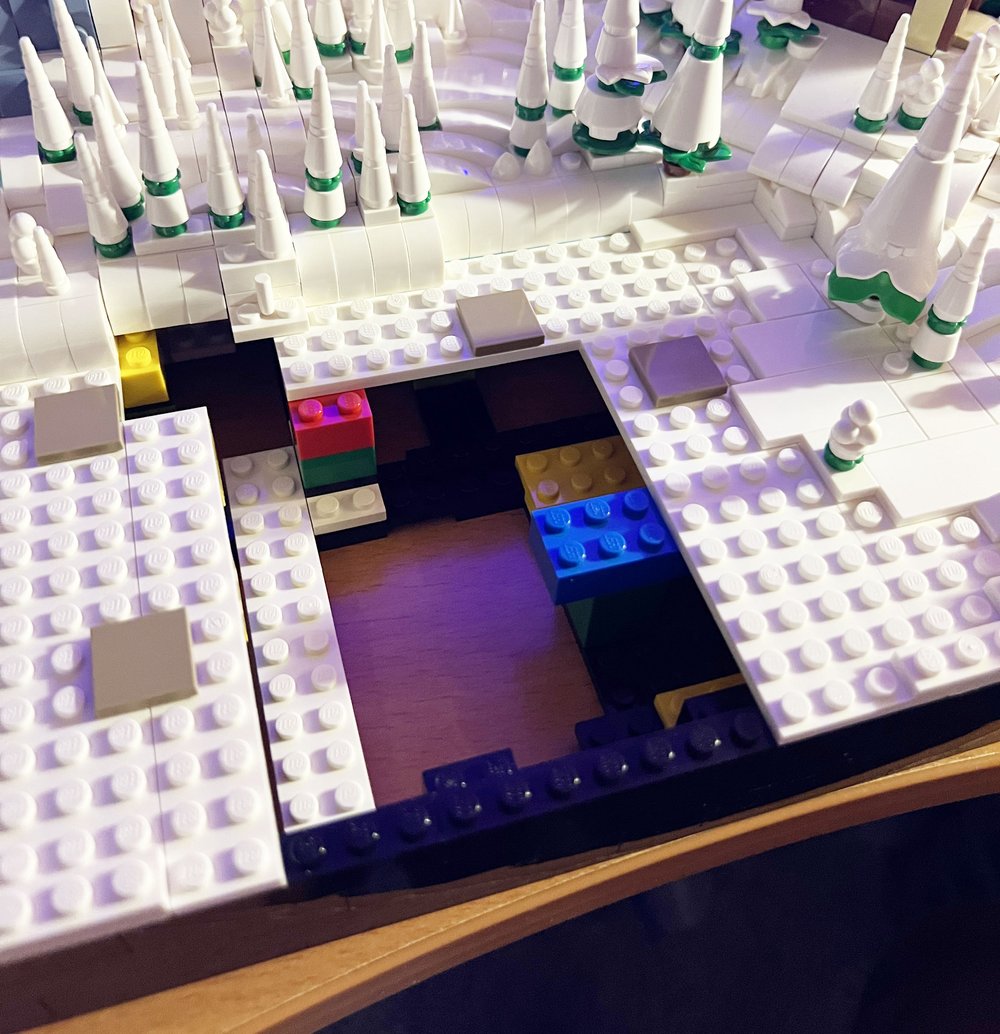
Last-minute reconstructive surgery for wiring the Santa Cottage lights.
Thankfully, I got very lucky and it wasn’t as bad as I thought when I actually started pulling it apart. It was very low and didn’t have a lot of hills built onto it that would have created a lot of trouble. Yet, it’s one of those stressful moments that can destroy your confidence when you know the con is less than a week away.
For Santa’s cottage, I wanted to use warm yellow lights, but with the opalescent blue windows they turned green! So I went with my few remaining cool white lights… but then the windows were shining like flashlights! Luckily I realized I had a dimmer that I used to dial down the brightness. It’s one of those fine tuning things I think are important, even if somewhat subtle and not very sexy.

Santa’s cottage lighting in place.
With the lighting done and wired and the MOC put back together, it was time to anxiously watch my BrickLink tracking numbers, hoping for the final parts to arrive in the mail.
Crunch Time for BrickCon
My first con was mere days away. While I waited for those final parts, bins and bins of MOCs I never had the chance to bring to a convention yet.
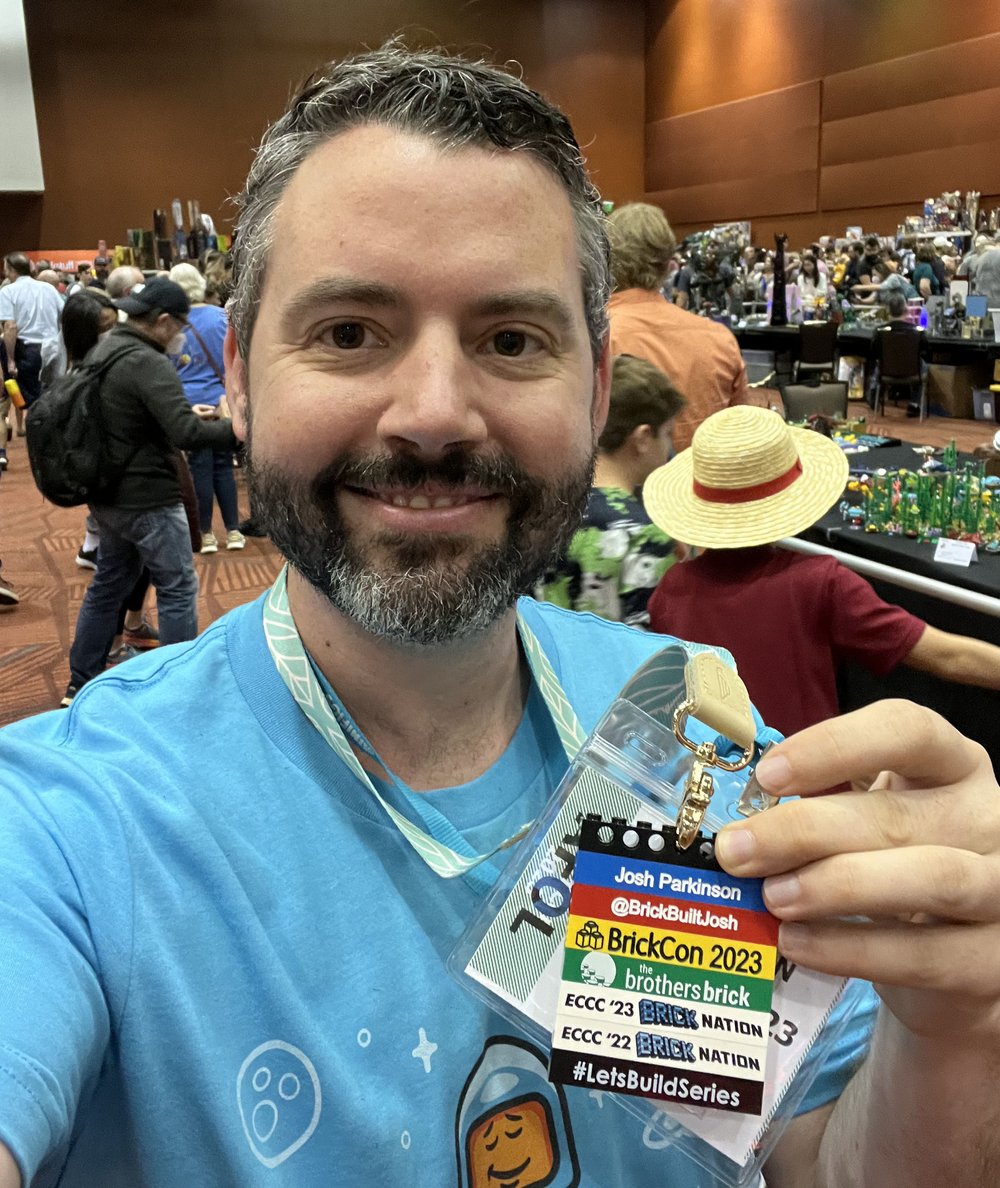
Builder’s first brick badge! Myself, Josh Parkinson, at BrickCon 2023.
I considered what I’d need for powering the lights. I prepared explainer cards and lists of interesting parts usage or animals to find to engage the viewers. I figured out my brick badge using a lanyard and Technic brick, and then added the printed/engraved bricks I had so far from Instagram challenges and showing at Emerald City Comic Con’s “Brick Nation.”
I went through the convention schedule, trying to figure out what was happening and what these games with cryptic names were supposed to be. Monday rolled around, and BrickCon was starting on Thursday.
Finally… finally… my final brick orders came! With a great sigh of relief, I spent the next three days hard at work on my backdrop. Building the sky up, creating smaller and smaller clouds going off into the distance, and creating a gradient as the sky darkened towards the top. The North Pole was finally done!
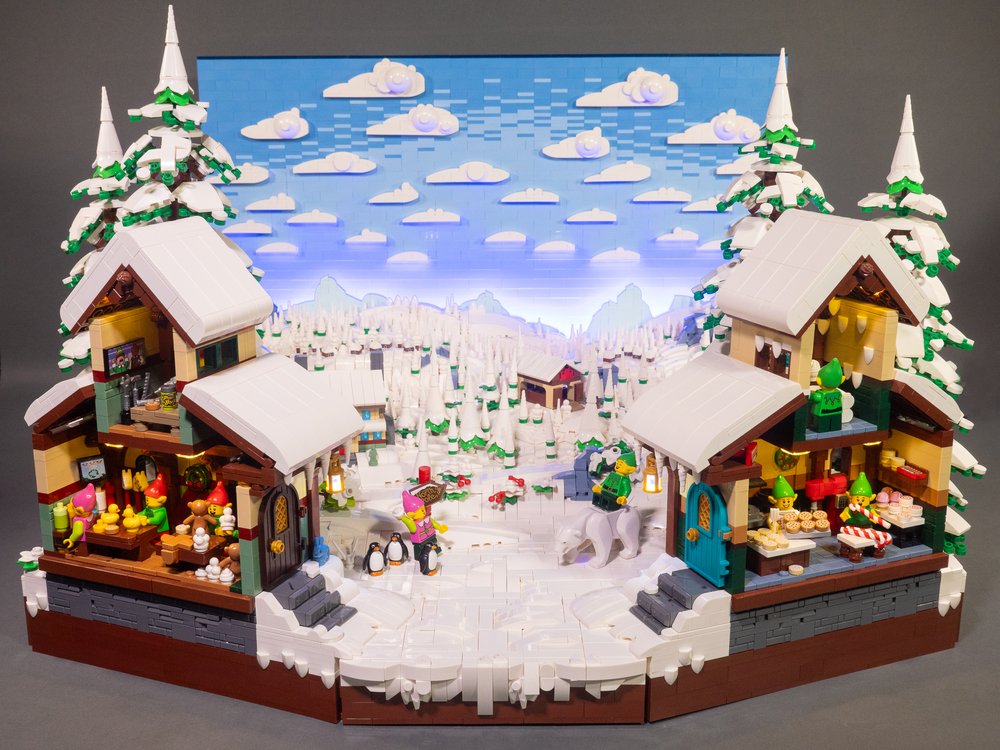
Completed North Pole MOC!
Well, sort of. When packing it, I found that the sky was too tall for the bin vertically. I had to put it on its side somehow in the bins. I didn’t want to use yet another bin, so I had to figure out a safe way to stack it with the landscape section inside the same bin.

Packed and ready.
I decided to build up some scaffolding on the back of the sky that would make the whole thing lay flat and fully supported when placed on its back. Then I created spacers to put on top to ensure the clouds weren’t crushed under the weight of the landscape section when stacked on top of it.
I cut up boxes, used some rug non-skid fabric and a board, and finally got it all in there in a supported way that wouldn’t break apart my sky backdrop on transit or shift around. At least, I hoped so!
And… it was the night before BrickCon. Everything was finally ready to go. Almost two years’ worth of MOCs!
'Twas the night before BrickCon, and the build was packed tight,
The landscape and trees, all hidden from sight.
My North Pole MOC, a year in its making,
Awaited its debut, with hopes it’d be breathtaking.
Elves worked away under a sky so bright,
With forced perspective showing an icy delight.
Taken apart snugly for the journey so near,
Awaiting to dazzle, the big day almost here.
Santa’s Big Day… in September
It was my first con. My biggest MOC. My first time transporting The North Pole, praying it wouldn’t collapse and crumble with each bump, stop, or turn. I don’t have a hand cart, so I took multiple trips to the parking garage to tote in my bins by hand. Then I pulled out each MOC hoping for minimal damage on the trip over. But something always happens…
I opened the bin for the foreground section of The North Pole and had a little heart-drop moment as I saw the big trees snapped in half. Thankfully, the rebuilding wasn’t terrible and it was a clean break without a lot of collateral damage. But it made me think that I’d want to try and reinforce them more fully in the future
After deciding I wanted to use USB power instead of batteries, I brought some wiring materials with me and did some tearing apart of the base to pass the USB cord out the back. I recommend it instead of constantly changing batteries. I also tried out a rotating turntable for my Muppet Monster Mashup Mansion since it really needed to be viewed from all sides to be appreciated. Thankfully that worked well.
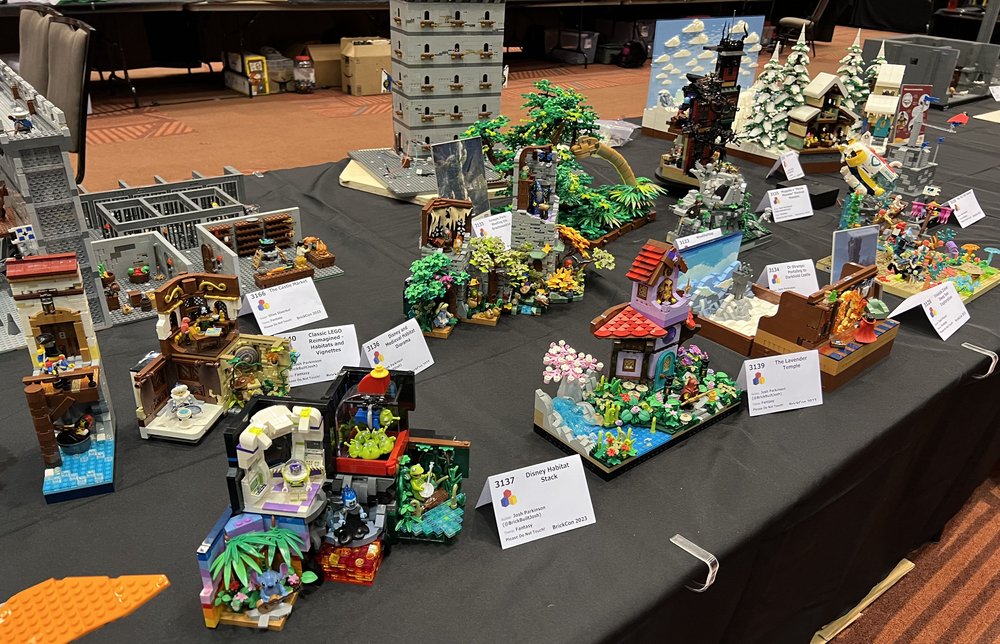
Some of the MOCs set up for display.
BrickConc was a blast. So many great builds to see, people to talk with, and all kinds of games, talks, and activities. It was a process of figuring out how things worked. Not everyone stays around their MOCs during the public exhibition portion (in this case, Saturday and Sunday during the day), but I like to, even if it’s just to quietly see the reactions and occasionally answer a question. (I stand in the center of the tables behind the MOCs to fit my more introverted nature, of course.)
I mean, it’s part of why we build and share our work—to see its impact on people. So I try to make a point of getting some time taking that in, feeling the rewards of all that work, and having it motivate me to keep building and challenging myself. So often, we’re struggling with comparing ourselves to others, feeling like imposters, dealing with depression, struggling with burnout, or moving on to the next thing before we recognize what we just accomplished. Taking some time to really let it sink in what we created and how it affects regular people (not just our peers) can go a long way when the con is over and you’re back in the building grind.
Lights Out and Lights On
I heard about one of those “lights out” evening events coming to BrickCon. So I built in lighting to take advantage of it. Basically, it’s one night of the con for a few hours where they turn the lights off or down really low. That allows the lighting in the MOCs to shine! It’s one of my favorite things which I also got to see at BrickWorld for the day I was there.
I wanted The North Pole to light up and have a totally different feel at night—to have a horizon glow for a night sky, warm lights keeping the elves cozy, and Santa’s cottage with a gentle twinkle. To accomplish it, the light that would best give the effect was a blue strip light. The sky was already blue, but in the dark, that blue light had this beautiful twilight glow effect that completely changed how the sky looked.
I think the night may have been my favorite version of this MOC, even though pictures don’t quite capture it.

Night mode!
All in all, it was a great first con, and I won two awards—one for The North Pole and one for my Jurassic Park “Meeting the Brachiosaurus” scene in the treetops.
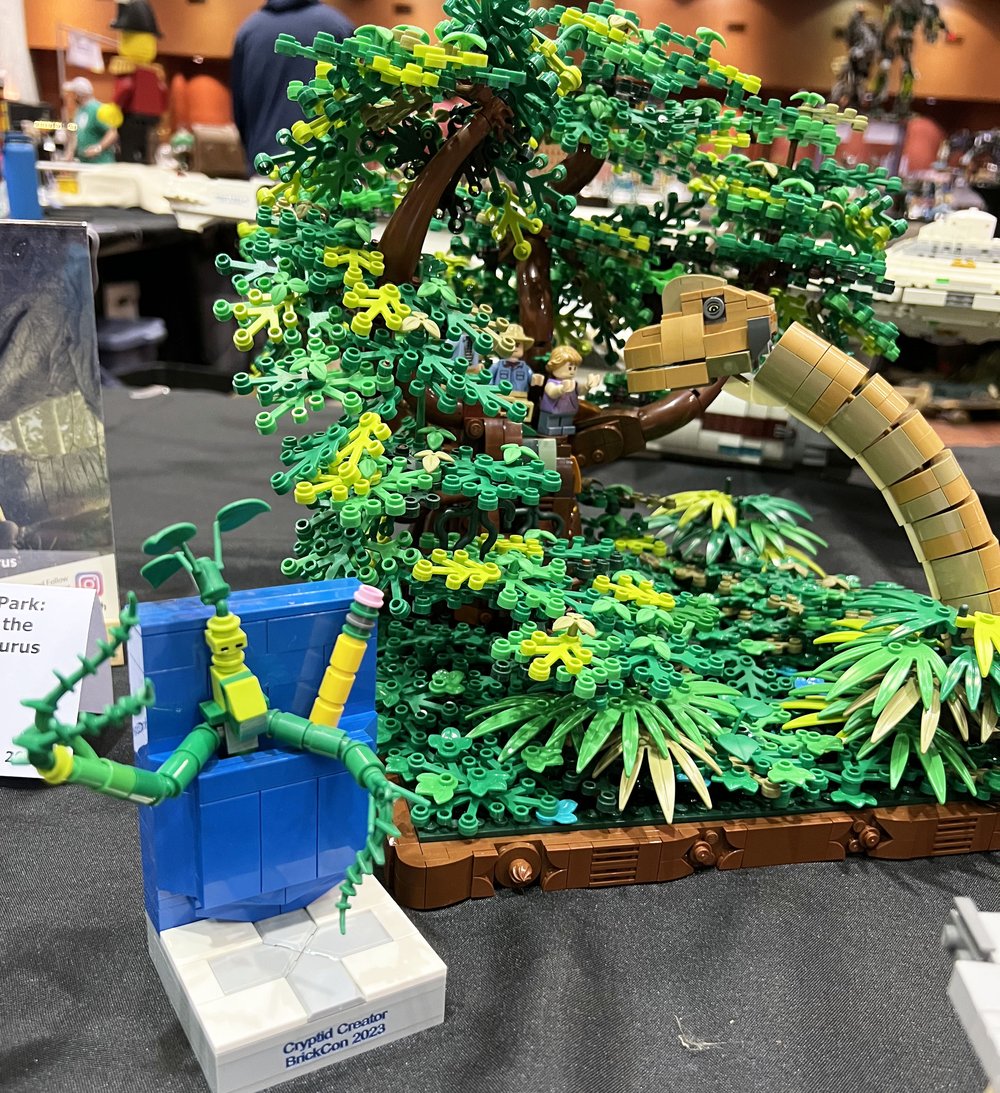
Trophy awarded to the Brachiosaurus MOC.
I particularly liked the brick-built trophies and the little token builds that fellow con attendees would place by their favorite builds. I’m looking forward to figuring out my own token idea, elaborating on my brick badge, and maybe even helping build a few trophies next year.
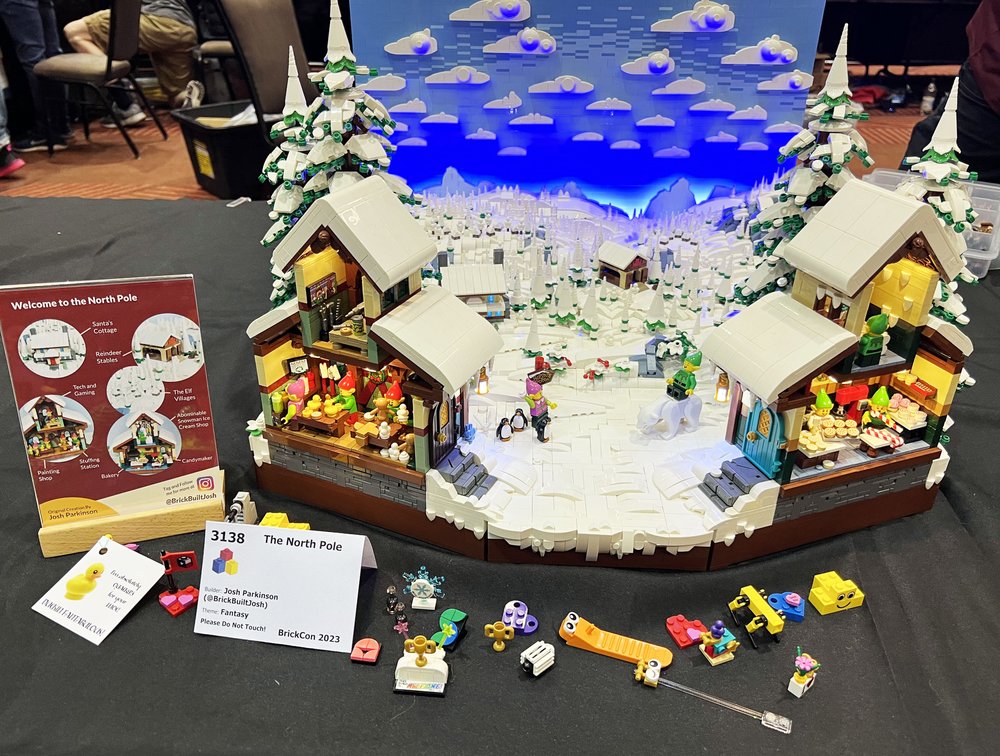
Tokens from other builders to show their appreciation for the MOC.
Habits and Habitats
Building for me is something that I have to get into like a habit… and building habitats certainly help ease me into a new project. My whole year was full of ups and downs, going through building famines and feasts. But at the end of the year, I was doing well. My Dad was getting back into things, and I had built something different than I had ever built before.
Looking back, I can appreciate what I accomplished and what’s yet to come. The North Pole helped me get my momentum back and I’m excited about what comes next. And my MOC taught me that it is all about perspective, life and LEGO included.
Have you built any habitats for minifigures? Let us know in the comments below.
Do you want to help BrickNerd continue publishing articles like this one? Become a top patron like Charlie Stephens, Marc & Liz Puleo, Paige Mueller, Rob Klingberg from Brickstuff, John & Joshua Hanlon from Beyond the Brick, Megan Lum, Andy Price, Lukas Kurth from StoneWars, Wayne Tyler, Monica Innis, Dan Church, and Roxanne Baxter to show your support, get early access, exclusive swag and more.

