Seamless SNOT: LEGO Techniques for Smooth Surfaces

In my earlier articles, I have covered some basic and advanced methods for building with a LEGO technique called Studs Not On Top (SNOT), otherwise known as sideways building. This time, I’m going to talk about a more personal and subtle aspect of SNOT: how to avoid grooves and gaps.

And (perhaps a little bit ironic) I will also talk about LEGO Braille Bricks and how they can be used to achieve smooth SNOT surfaces—despite being purposely designed to be able to be recognized by touch.
Groovy Elements
Many LEGO elements have small grooves as a design feature to make them easier to remove from other elements. You are most likely to have seen these on tiles and other elements where it would be hard to separate the pieces. Grooves are a more modern LEGO invention to help fingernails and separators remove them. Though jumpers and grilles began without grooves, they are quickly becoming a thing of the past. “With groove” is the new standard.
Here’s a visual example of some LEGO elements with grooves:
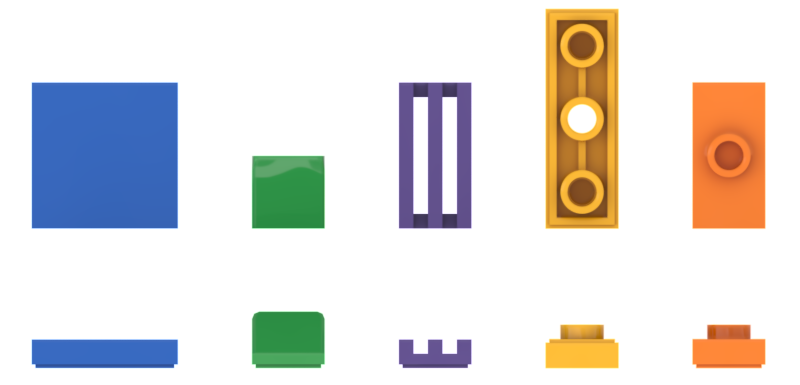
Other elements that can cause gaps and holes are parts with rounded edges, for example in brackets and panels. (There are older mold variants of some of these elements with sharp edges)
When elements with grooves are used for SNOT purposes, the groove stands out like a sore thumb. Another personal aspect of “seamless SNOT” that I mostly try to apply is to eliminate the “lips” of slopes. It might not always have to do with SNOT, but I will give you some examples of how to avoid those edges.
Sharp Edged Elements
When I build SNOT structures, I mostly want to avoid grooves and gaps. That is why I like to use parts like these that have hard edges with no grooves:

Building with these makes it possible to build smooth SNOT surfaces without grooves. There are also a few other plates with similar properties (6179 and 88646 for example) but they are a bit too big to be really useful in my opinion.
Let me show you some examples on what I mean with seamless SNOT.
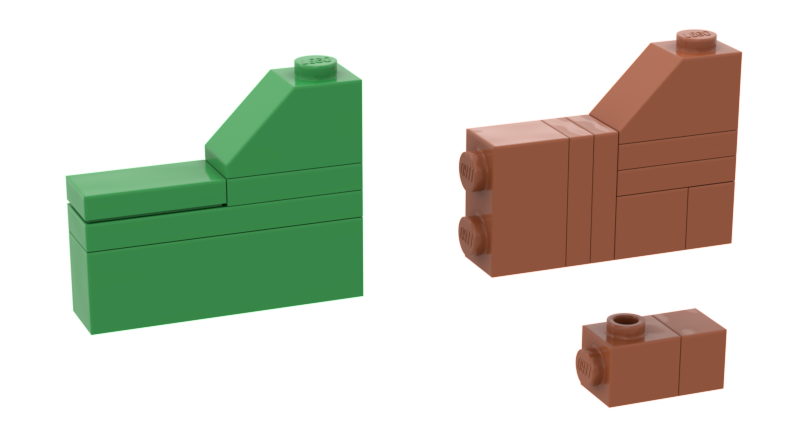
Studs Against Studs
A common building situation happens when you have two constructions and you need to join them studs against studs. This mostly happens to me when I want to build round holes with arches. The usual way to remedy this is to use tiles with their flat surfaces facing towards each other. The result of this, however, is that you end up with a few lines of grooves which might or might not be what you are going for in your final look.
An alternate way of accomplishing the same look but seamless is to use panels instead. I mostly use part 23969 because of its sharp corners.

Which one of the examples above do you think looks best?
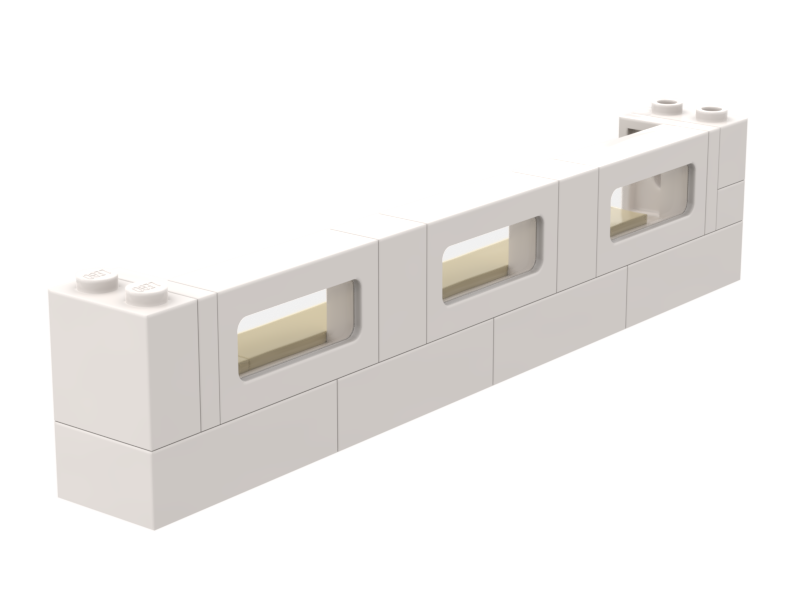
Building Sideways
Let’s say you want to build a wall in a house and you want to place the windows sideways. Maybe to mimic the windows of a basement? The easiest way would then be to let the construction rest upon a row of tiles. But is there a way to build that without visible grooves? Yes, many ways. An example would be to use the “2x2 half plate/half tile” element 33909 or element 4585. (I’ll show you another way to do it later in the article.)
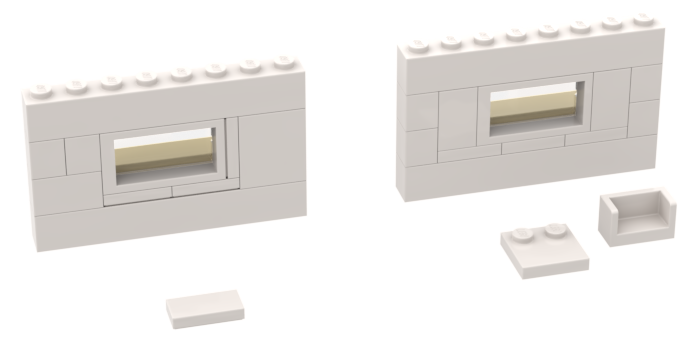
It’s a very small difference, but if you’re looking for a way to get rid of grooves, the alternative on the right is one way to do it.
More Sideways Building
In some cases, you might want to make sure your SNOT construction stays in place, and therefore, you might want to insert a stud into a Technic hole. The most common way to do this is to use a 1x1 plate and cover the rest of the studs with tiles. Like this:
My advice would instead be trying to use the half tile/half plate element 33909 again to get rid of that groove:

In my examples above, I assume there is enough space behind the SNOT structure to hide any bits that hang out. In my experience, it is not that hard to hide something on the backside.
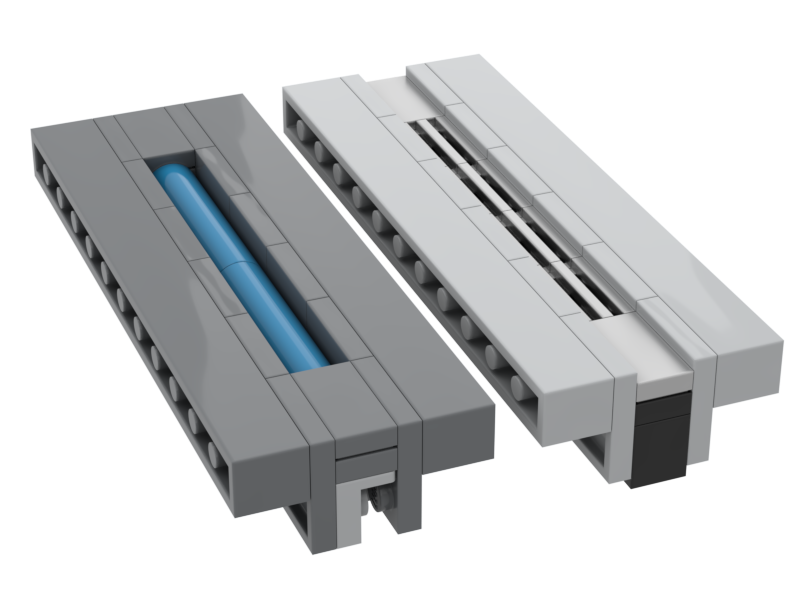
More Seamless SNOT
If you expand these techniques, there are many different ways to apply them in LEGO builds. The image below further demonstrates how elements without grooves can be used in various ways to achieve seamless transitions.

Here is another example of how these seamless SNOT techniques can be used. Maybe they could be used to add a row of piping to a wall? Or an inset gutter in a garage floor?
Slope Transitions
As I mentioned before, I also mostly try to eliminate the small edge or “lip” on slopes when placed on studs. To me, the connection is extra annoying because the height of this edge is ½ plate, so that distance has to be eliminated with SNOT:
The build on the left is how a slope normally looks when you’re building studs up. The version on the right is the seamless SNOT version. where the transition to the sloop is smooth.
Here are some other examples of when you might find this technique useful, especially when adding detailing:

Braille Bricks
Now that you know what seamless SNOT means, let’s take a look at some other very specific bricks that come from an unexpected place that can help us—Braille Bricks.
In 2019, LEGO Braille Bricks were announced with many new elements that immediately caught my attention for how the elements could be used for SNOT applications. At first, this set was only available through LEGO Education and, therefore, only possible to order for schools and hospitals. BrickNerd published an article about the bricks and even followed up with an article showing how the bricks can be used in MOCs.
Last year, the bricks were made available to everyone, so I picked up a copy this year when it was available to buy from Sweden. I have now been able to try these bricks out and get a feel for how they can be used for SNOT.
Braille is the alphabet made up of raised dots, so visually impaired people can feel the raised bumps, with each grouping representing a specific letter or number. In the LEGO version, the letters are represented by 2x4 bricks with some of the studs removed. The result is basically a smooth tile coming in at one brick tall without any grooves with a few studs here and there.

Image from legobraillebricks where you can read a lot more about the Braille alphabet and how you can use the Braille bricks in education.
I made my own digital versions of Braille bricks to show you some of my ideas. My versions don’t have the printing on them, but I think you will be able to get the idea. Here are some of the more useful Braille Bricks when it comes to SNOT techniques: -, K, =, C3, L, A1 and E5.

The bricks come in all different colors. I assume this is helpful to people who are visually impaired but not totally blind. All bricks in this set are either white, yellow, red, lime green or medium azure. You get several of each letter, but each individual letter is always the same color, so the application for SNOT is limited. I myself use white, red, and yellow a lot, (though I hardly ever build with medium azure or lime green). But those colors might be useful for other builders. (Color is indeed subjective!)
As you probably have noticed, some of the Braille bricks can be built with other bricks for much the same result. For example the following:

The end result is still without grooves and with sharp corners. However, I still think the Braille bricks will give us a more tidy and clean final result!
A limiting factor when using Braille bricks for SNOT might be that they all (mostly) have a print on them. The print is in the form of letters and numbers on one end of the brick. In some cases, you might want the print to show, but for my SNOT ideas, I have tried to cover it.
Braille SNOT
Let’s take a look at how these Braille bricks can be used in a few seamless SNOT applications:
Brackets can be used to make seamless transitions from a brick to a tile. Or maybe from a brick to a curved slope?

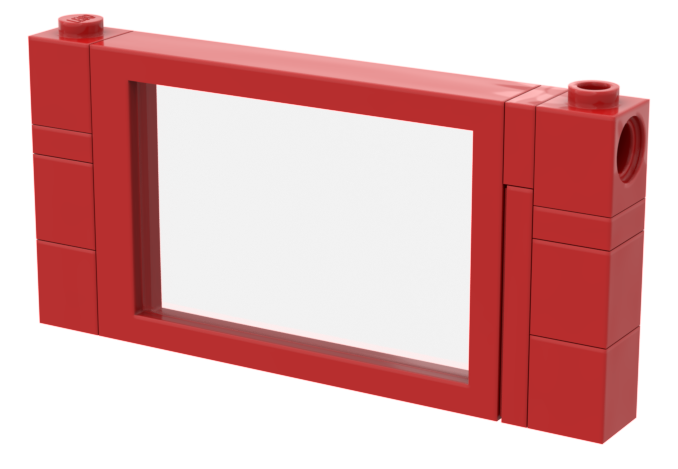
You can also use the Braille bricks with Technic bricks for sideways building like we did with the window earlier in the article.

The image below shows some other possible ways to build with Braille and Technic bricks.

And here is an example of how Braille bricks, together with the other elements previously mentioned, can be used in sideways building:
It might be subtle, but the bottom row is built out of four white Braille bricks. and the entire surface is seamless.
Inset Heights
Another interesting detail about the Braille bricks is that they have completely sharp corners with smooth sides. That makes it possible to build smooth blocks. Let’s have a look at that “crate” from the intro image to this article as an example:

It’s built with four of the “-” bricks sticking out from a SNOT frame. This brick and a few others can be used to build seamless constructions with sharp corners. Another example is one of the blank yellow bricks included in the set. Because there is no print, it can be used on its side, like this:

Another idea with these kinds of bricks is to use them for inclines or stairs. You just place the bricks at different heights and build a frame around them for a seamless, gradual slope or staircase.

Are Braille Bricks going to be the next revolution in LEGO SNOT building? Probably not. As a BrickNerd (and a SNOT-Nerd!), I will continue to try to use them in my MOCs, but I don’t think the set (which is a bit expensive) is a must-have for all MOC builders. It is more of a curiosity.
But when it comes to seamless SNOT, if you are looking to build things with smooth transitions from one brick to another, Braille bricks may hold a few hidden gems for specific situations. (If you found one of my ideas worthy of exploring, it might be simpler to buy just some of those specific bricks rather than the full set of Braille Bricks). I hope you learned something new today and that you’re hopefully eager to try some seamless SNOT for yourself!
Do you have some other ideas for how Braille Bricks can be used for SNOT techniques? Please let us know in the comments!
Do you want to help BrickNerd continue publishing articles like this one? Become a top patron like Charlie Stephens, Marc & Liz Puleo, Paige Mueller, Rob Klingberg from Brickstuff, John & Joshua Hanlon from Beyond the Brick, Megan Lum, Andy Price, Lukas Kurth from StoneWars, Wayne Tyler, Monica Innis, Dan Church, and Roxanne Baxter to show your support, get early access, exclusive swag and more.